We Were Unable to Reach Your Phone Please Try Again Errorcode 50012
Microsoft has finally started the gradual rollout of Windows 11, the most meaning refresh in more a decade. In this new version, you will detect many meaning changes and features, including a fresh new interface with rounded corners and transparent elements. In that location's a new Start carte and Taskbar that now are front and middle. Activity Center has been replaced for ii new experiences known as Notification Centre and Quick Settings. Y'all will find a new version of Settings, and in that location are several new features, such equally Widgets, Conversation from Microsoft Teams, Snap layouts and Snap groups, Automobile HDR and DirectStorage for a ameliorate experience, and much more.
Although the company has finalized the development earlier to spend more time tweaking and fixing bugs and other problems earlier the official release engagement, the new version includes many code changes that could mean many unknown problems, compatibility problems with hardware and drivers, and more.
Since Windows 11 requires consummate reinstallation, computers may besides experience other problems that are not caused by the new version. Instead, the upgrade process may become stuck or fail because of driver issues, incompatible applications, device drivers, custom configurations, or problems with some pieces of hardware.
In this Windows eleven guide, nosotros will share some of the problems you lot may run across during and afterward the installation and their possible solutions.
Windows eleven fixes to common problems
On Windows 11, yous may come across two types of problems. Yous tin stumble upon usually known bug during and afterward the upgrade, such as problems with storage, features, activation, and updates that are not problems directly tied to the new Os.
Also, there are those bug that are straight results of bugs with the new version. For instance, the installation may neglect because of a compatibility issue with an app or hardware, or these bug could be related to drivers and security software like antivirus.
Since Windows xi is based on Windows 10, the same installation problems you may meet on Windows 10 are likely to appear on Windows xi.
This guide focuses on helping you become around common upgrade problems and steps to mitigate specific known bug (if available) during and after the installation.
- How to prepare system requirements issues on Windows 11
- How to set up Windows Update problems on Windows 11
- How to fix USB flash drive problems installing Windows 11
- How to fix setup problems installing Windows xi
- How to fix Installation Assistant bug installing Windows 11
- How to fix mistake code 0xC1900101 upgrading to Windows 11
- How to fix mistake code 0x80070070 upgrading to Windows 11
- How to prepare mistake code 0x80070002 0x20009 upgrading to Windows 11
- How to gear up error code 0xC1900107 upgrading to Windows 11
- How to fix error code 0x800F0923 installing Windows 11
- How to fix mistake lawmaking 0xC1900208 upgrading to Windows 11
- How to fix black screen problem on Windows eleven
- How to set up error completing installation of Windows eleven
- How to prepare Wi-Fi and Ethernet adapter problems on Windows 11
- How to fix VirtualBox not working on Windows xi
- How to set Intel Killer networking problems on Windows 11
- How to gear up Cốc Cốc browser not working on Windows 11
- How to fix File Explorer memory leak on Windows 11
- How to fix AMD performance event on Windows xi
- How to fix Start menu broken on Windows 11
- How to 'This PC tin can't run Windows 11' error on Windows eleven
- How to fix Installation Banana fault 0x8007007F on Windows eleven
- How to USB printer problems on Windows xi
- How to non-ASCII characters app problem on Windows 11
- How to printer setup problem on Windows eleven
- Windows 11 tips to minimize installation problems
How to set up system requirements issues installing Windows 11
Ane of the biggest confusions with the new version of Windows is the new system requirements, and this is because they are different from the previous version, and it'south not clear what devices are uniform, causing a lot of confusion among users.
Windows 11 official requirements
Here are the minimum hardware requirements to install Windows eleven:
- Processor: 1GHz or faster CPU or System on a Chip (SoC) with two or more than cores.
- Memory: 4GB.
- Storage: 64GB or larger.
- System firmware: UEFI with Secure Boot enabled.
- Graphics: Compatible with DirectX 12 or later with WDDM two.0 driver.
- TPM: Trusted Platform Module (TPM) version 2.0.
- Display resolution: High definition (720p) display greater than 9 inches diagonally, 8 bits per color channel.
Confirm if device will run Windows 11
To confirm the bones hardware specifications on Windows x, utilize these steps:
- Open Settings.
- Click on System.
- Click on Well-nigh.
-
Confirm the processor, memory, and organization type.
 Source: Windows Fundamental
 Quick note: The RAM has to be larger than 4GB, and the processor must be an Intel's 8th Gen or newer or an AMD Zen 2 or newer. Y'all can find more than information on the processor compatibility in this guide. Also, the arrangement type must exist 64-chip since Windows no longer comes in 32-flake.
- Click on Storage.
-
Confirm the hard drive is larger than 64GB.
 Source: Windows Central


You can also confirm the device hardware specifications on the manufacturer's support website.
Once you lot confirm the hardware specifications, brand certain the device has an enabled Trusted Platform Module (TPM) version 2.0. Yous can complete this task with these instructions.
Also, the new version of Windows requires Secure Boot. You can utilize this guide to cheque the feature state and the steps to turn it on as necessary.
Alternatively, you can run the official PC Wellness Check (download is at the finish of the page) application to confirm whether your computer will run Windows eleven. The tool will let you know precisely the uniform components and those that are not so that yous can deed appropriately.
How to set up Windows Update problems installing Windows 11
Windows Update is the recommended method to download and install Windows eleven, simply sometimes you lot may run into errors that tin can prevent your computer from getting the update.
Resolve PC doesn't currently meet arrangement requirements
If you get the message proverb: This PC doesn't currently see Windows xi system requirements, it means that one or more required components are missing, and unless yous resolve them, you won't exist able to continue with the installation.
Usually, the setup will explicate the problems blocking the upgrade. For case, you lot these or other reasons:
- The arrangement disk needs to be 64GB or larger – The partition system division needs to be larger than 64GB. If you have a device with limited capacity, yous will need to upgrade the hard bulldoze.
- The PC must back up TPM 2.0 – If this is a modernistic device, the chances are that it has a Trusted Platform Module, just it might exist disabled, you have a TPM, but it'due south version one.2, or it could exist the case that the computer doesn't have the security module
In improver to these, the Windows eleven setup may besides complain about Secure Boot. If you have a device with UEFI and TPM 2.0, so the device is likely to have the Secure Boot feature.
Set deejay space requirement
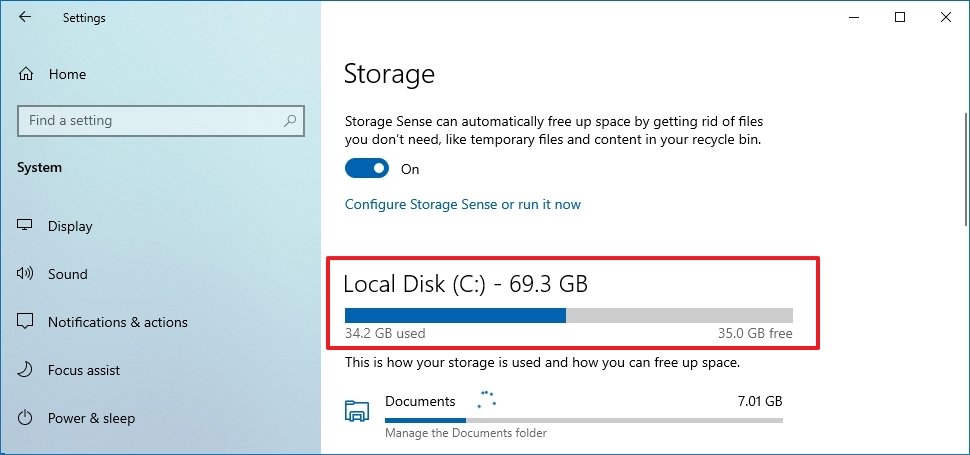
To check the storage infinite on Windows ten, utilise these steps:
- Open up Settings.
- Click on Storage.
-
Under the "Storage" section, confirm the size of the drive.
 Source: Windows Central

If the drive is under 64GB, you lot will need to upgrade the storage. The arrangement is referring to the maximum capacity, non the free bachelor space.
Fix TPM two.0 requirement
To check and enable the TPM two.0 module on Windows 10, use these steps:
Warning: Changing the incorrect settings can make the computer unbootable. Y'all should access the motherboard settings simply when you accept a expert reason. Information technology's assumed that you lot know what you lot're doing.
- Open up Settings.
- Click on Update & Security.
- Click on Recovery.
-
Under the "Avant-garde startup" section, click the Restart now button.
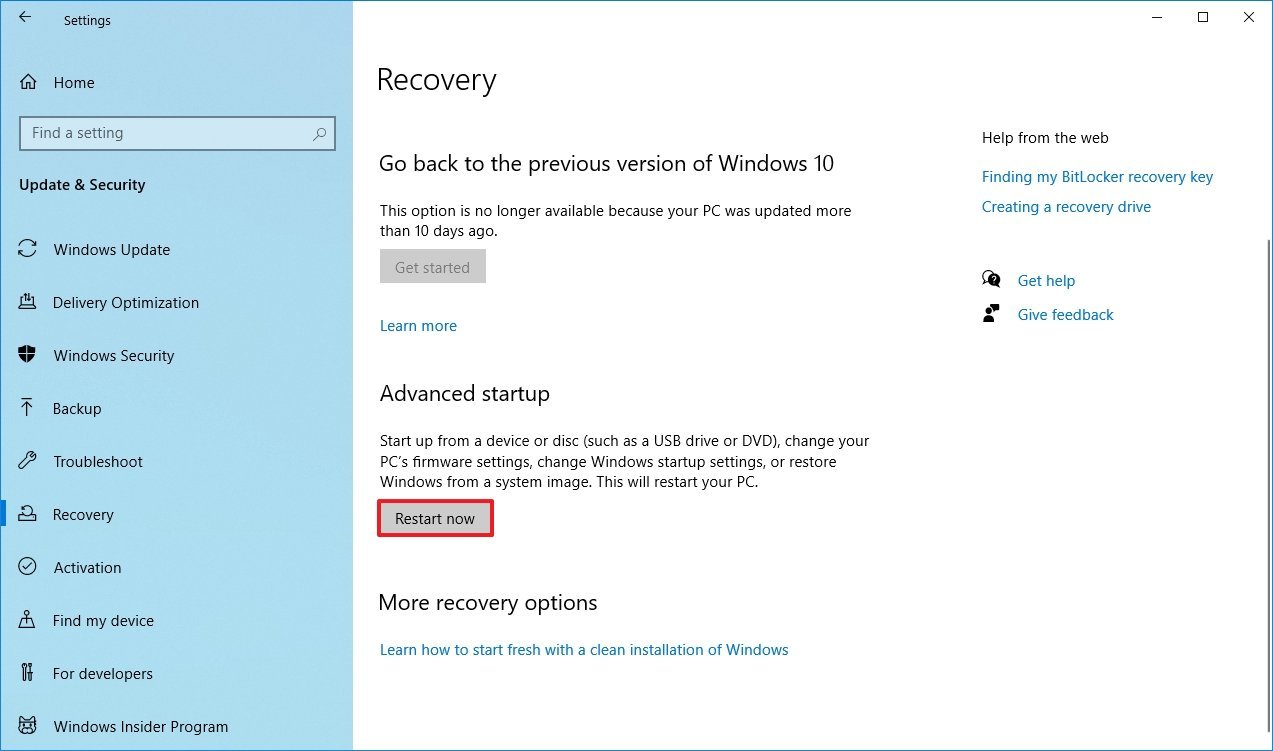 Source: Windows Central
 -
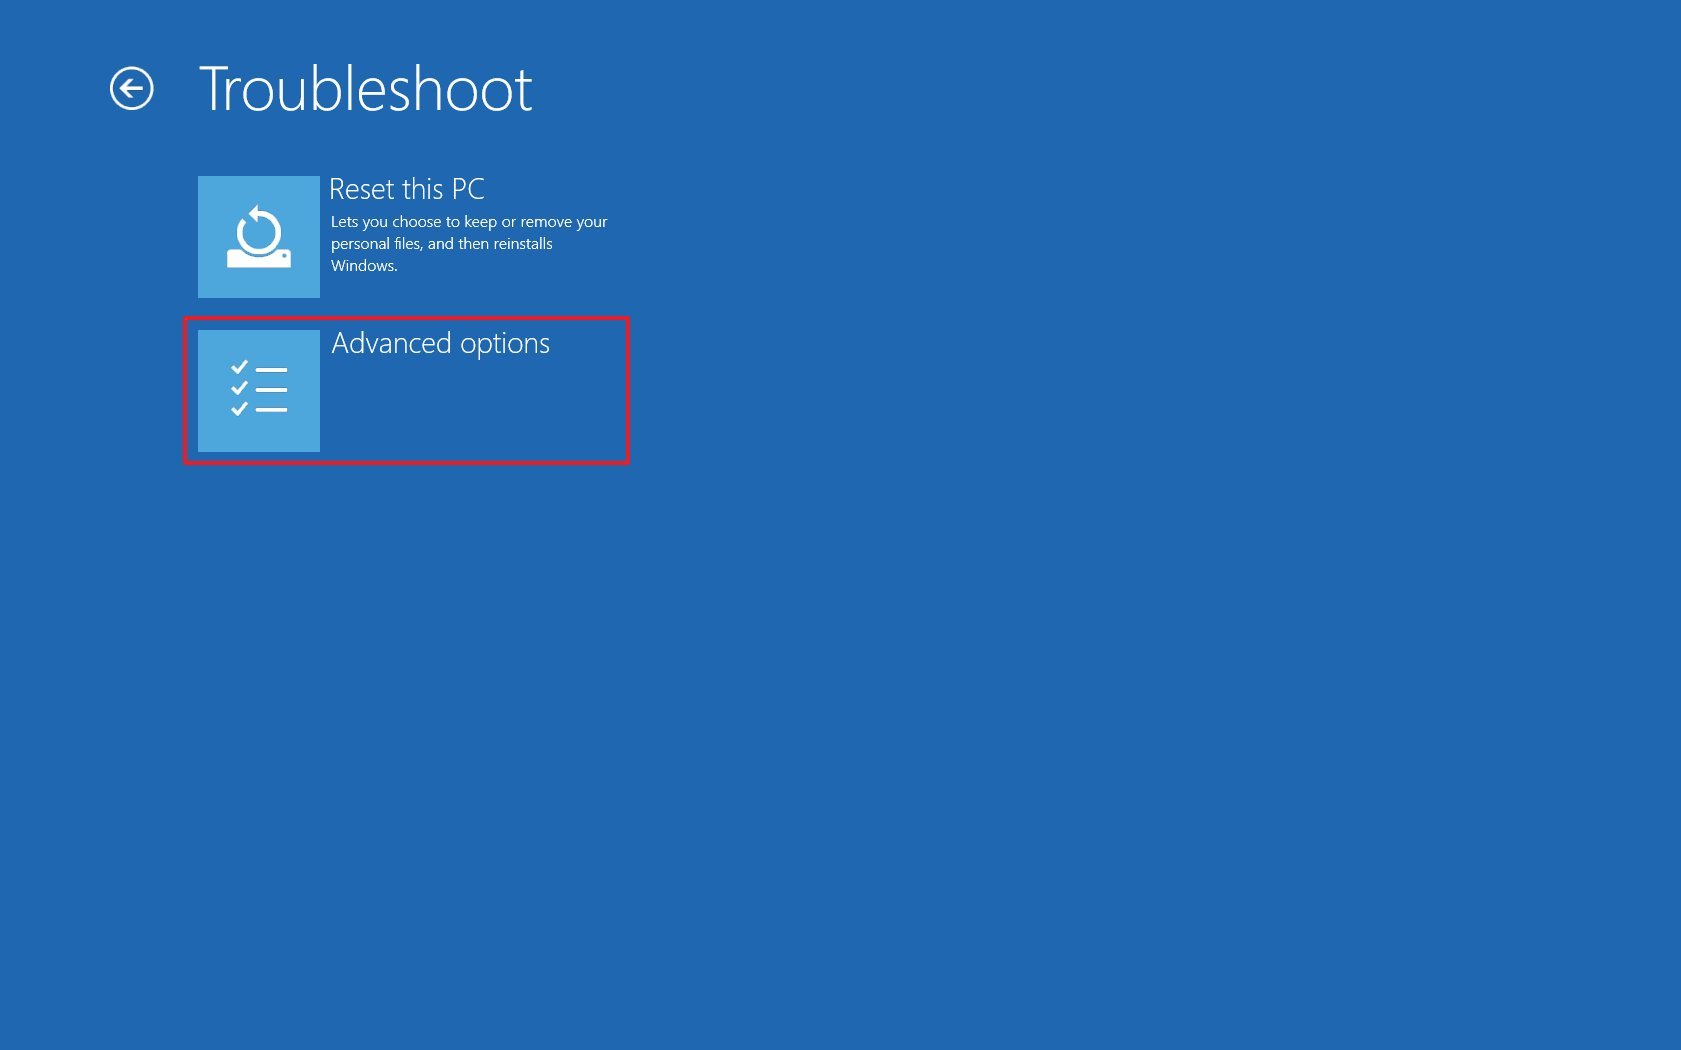
Click on Troubleshoot.
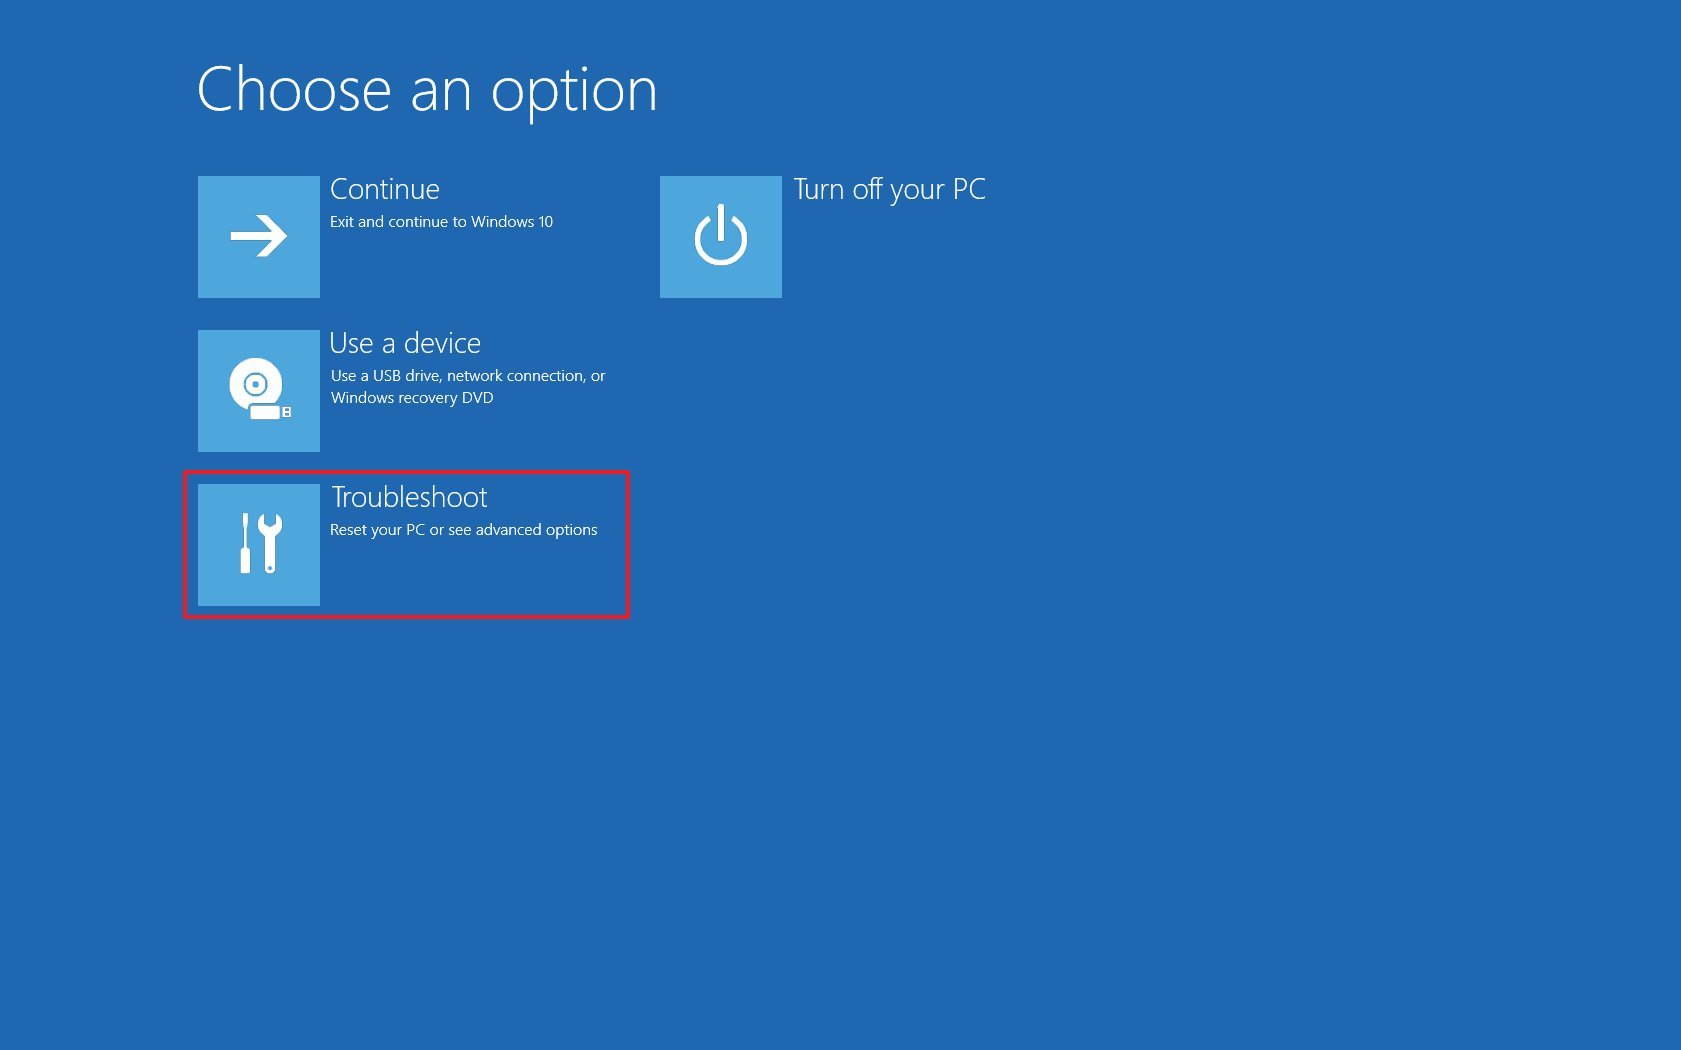 Source: Windows Primal
 -
Click on Advanced options.
 Source: Windows Fundamental
 -
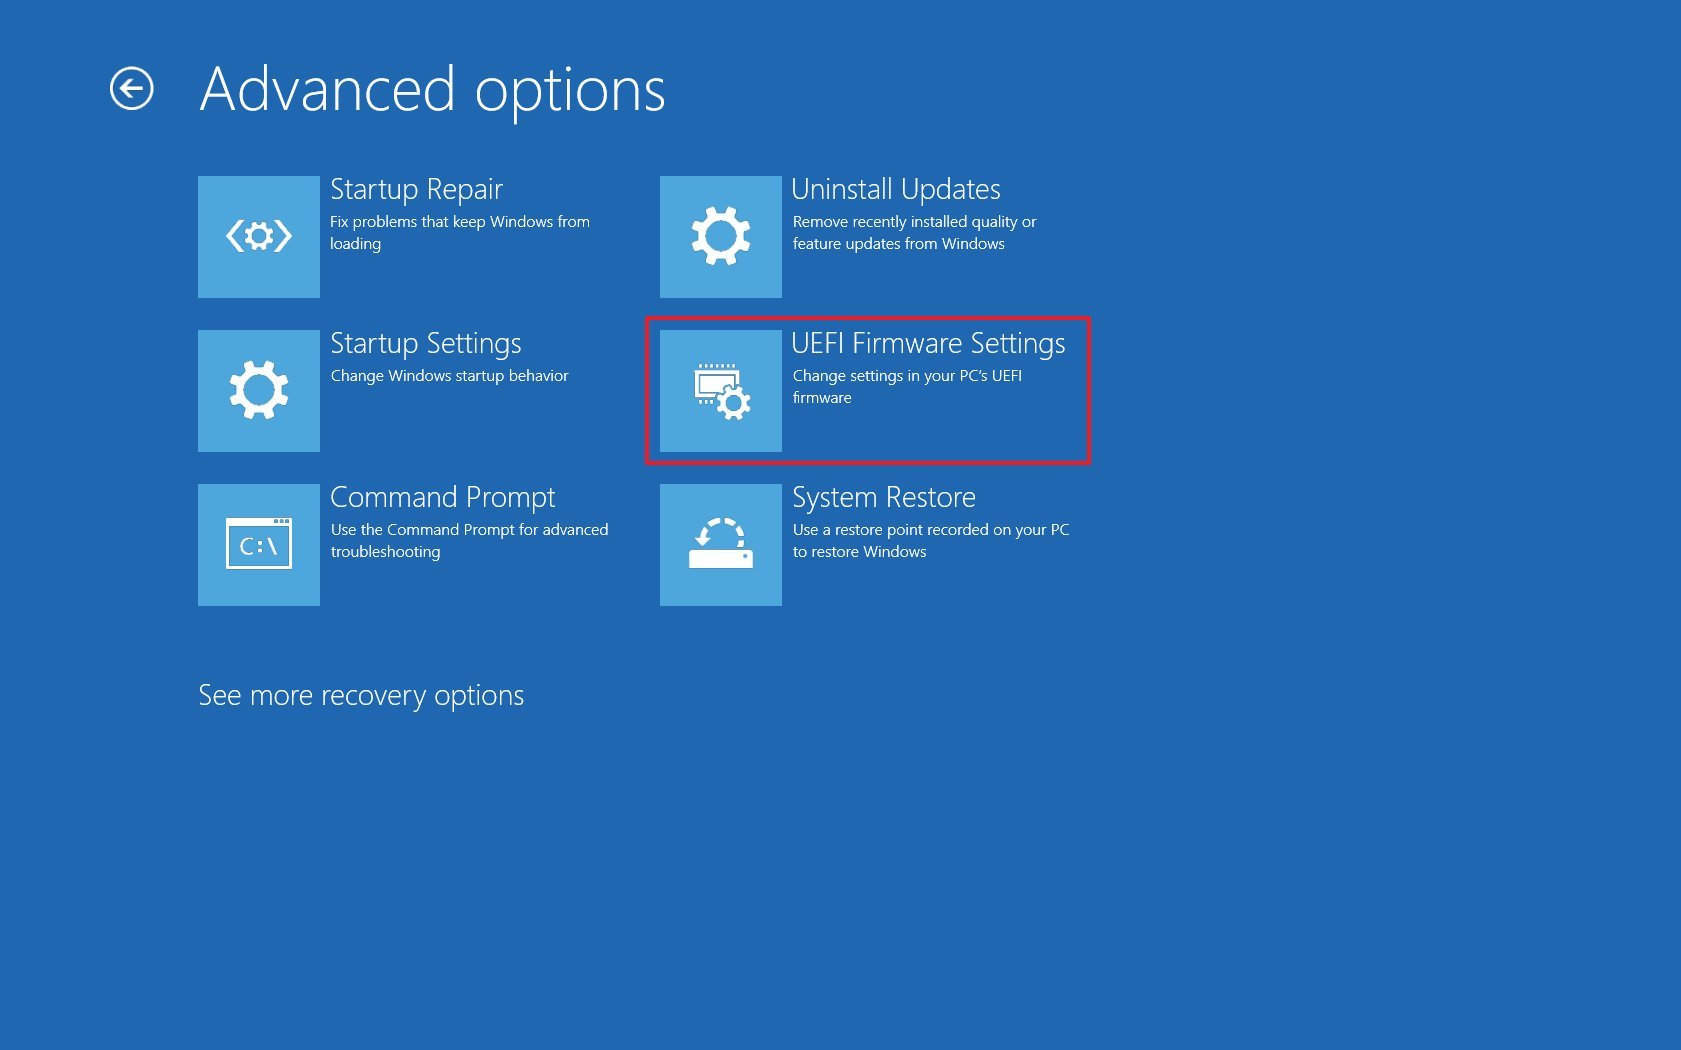
Click the UEFI Firmware settings option.
 Source: Windows Cardinal
 Quick tip: If yous have a legacy BIOS, the pick will not exist available.
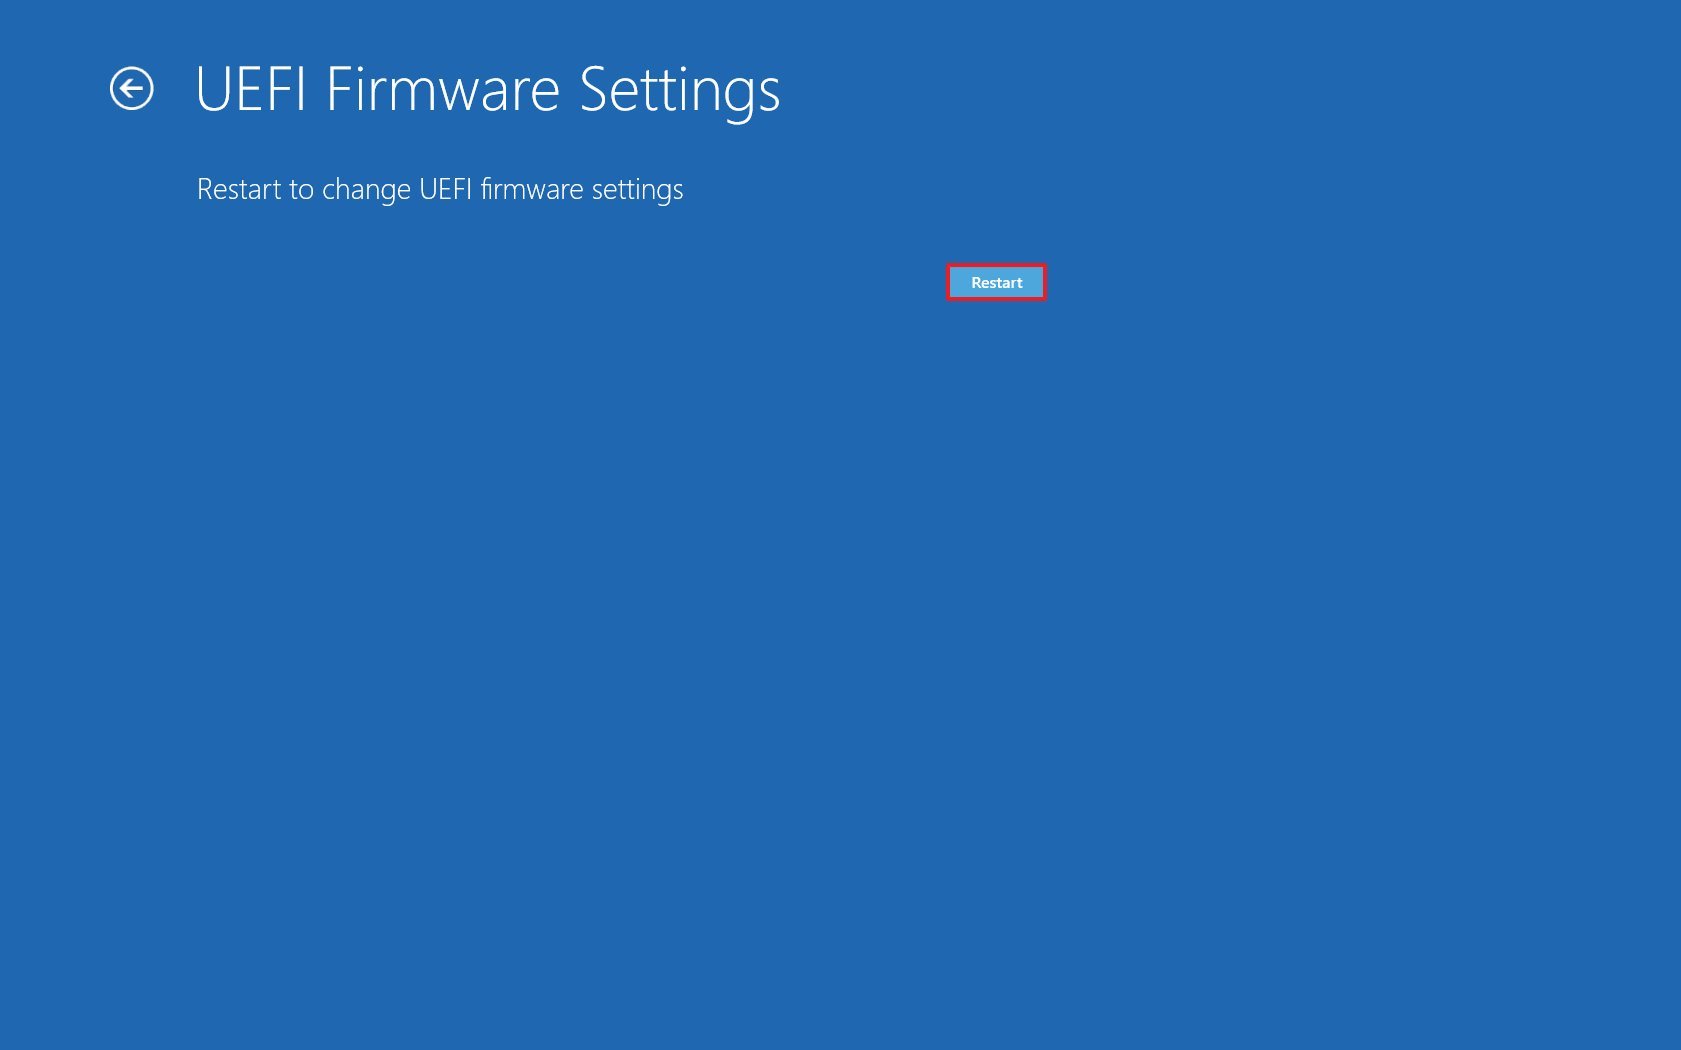
-
Click the Restart push button.
 Source: Windows Primal
 -
Open the security settings folio.
Quick note: The UEFI settings are usually dissimilar per manufacturer and even per reckoner model. As a upshot, you may need to bank check your manufacturer support website for more than specific details to find the security settings.
-
Select the Trusted Platform Module (TPM) option and printing Enter.
 Source: Windows Central
 -
Select the Enabled selection and press Enter.
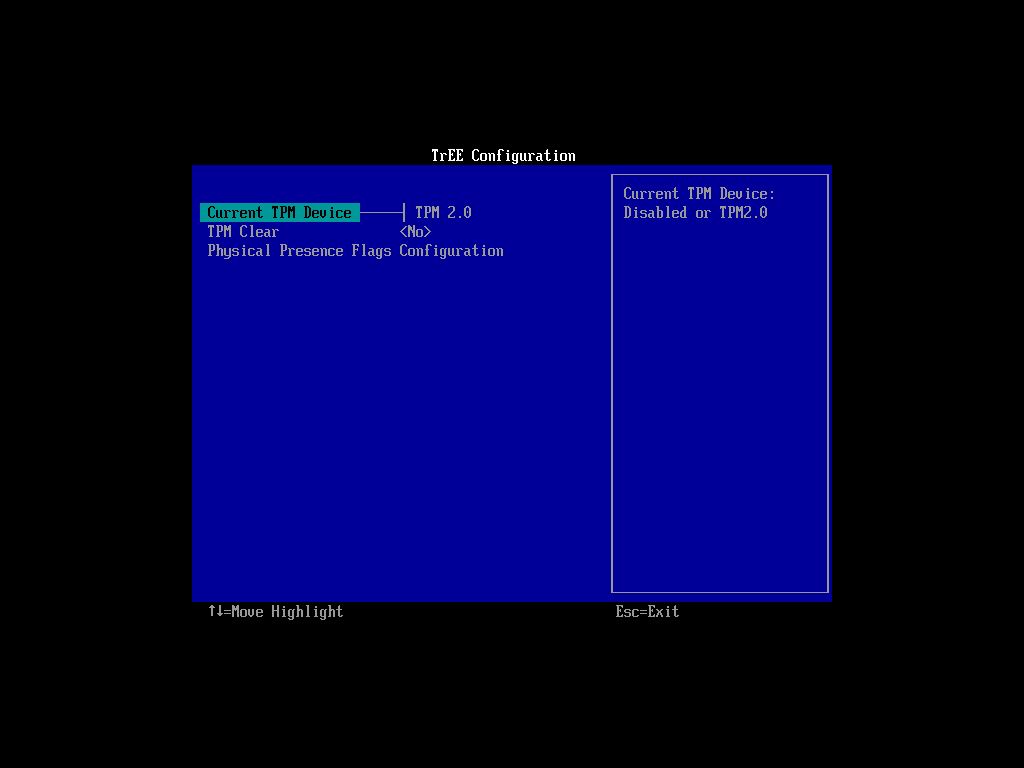 Source: Windows Central
 - Leave the UEFI settings.
- Confirm the changes to restart the computer.


Once yous consummate the steps, the security module volition allow you lot to configure and use features similar BitLocker or pass the compatibility check to install Windows xi.
If you need additional assistant, follow the instructions in this guide.
Fix Secure Boot requirement
To enable Secure Boot on your computer, use these steps:
- Open up Settings.
- Click on Update & Security.
- Click on Recovery.
-
Under the "Advanced startup" section, click the Restart now push button.
Source: Windows Cardinal -
Click on Troubleshoot.
Source: Windows Key -
Click on Advanced options.
Source: Windows Central -
Click the UEFI Firmware settings pick.
Source: Windows Central Quick tip: If y'all accept a legacy BIOS, the option volition non be available.
-
Click the Restart button.
Source: Windows Key -
Open the kick or security settings page.
Quick note: The UEFI settings are usually different per manufacturer and even per reckoner model. As a issue, yous may need to bank check your manufacturer support website for more specific details to find the corresponding settings.
- Select the Secure Boot selection and press Enter.
- Select the Enabled option and press Enter.
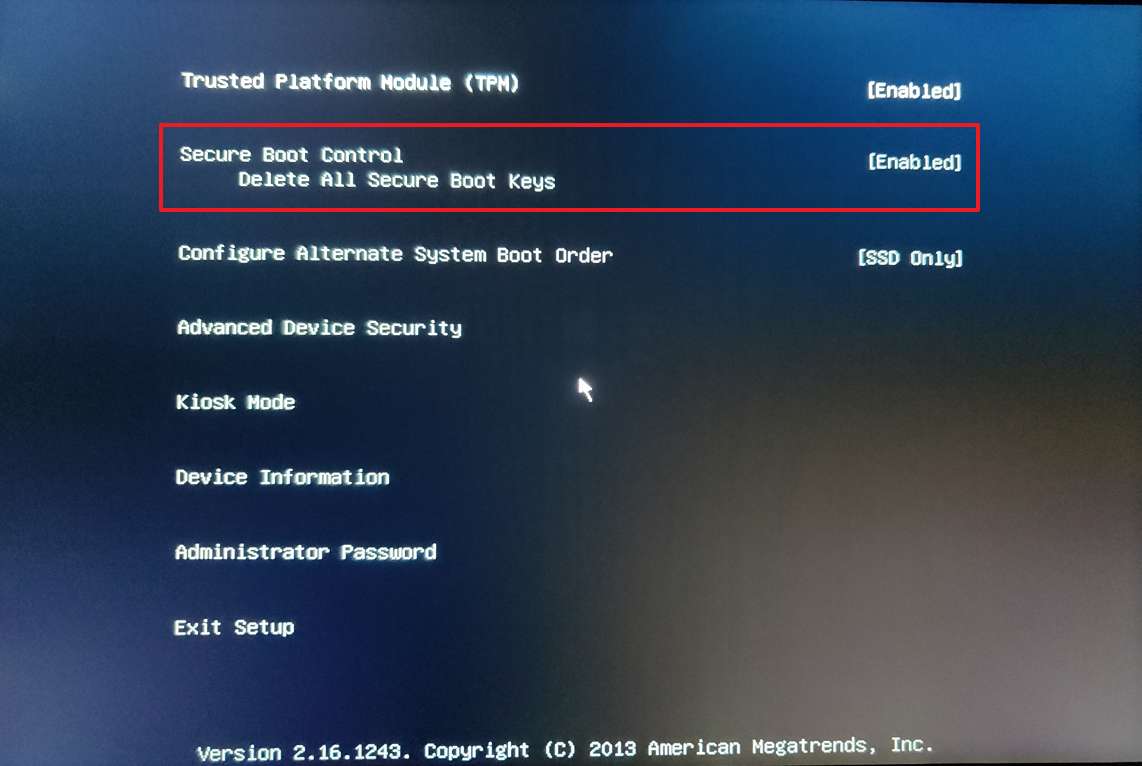
- Exit the UEFI settings.
- Confirm the changes to restart the reckoner.

After y'all complete the steps, the security module volition enable, and the figurer should now meet the Windows xi requirement.
Fix unexpected errors using Windows Update
In addition to the system requirements problems, you lot may likewise encounter Windows Update bug, merely you tin can use the born troubleshooter to solve the most mutual issues.
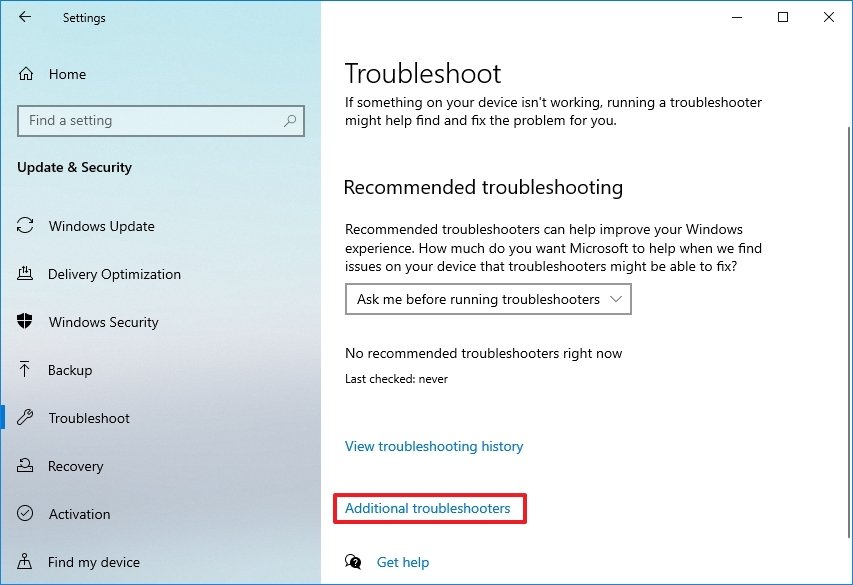
To prepare Windows Update to download Windows 11, use these steps:
- Open Settings.
- Click on Update & Security.
- Click on Troubleshoot.
-
Click the Additional troubleshooters pick.
 Source: Windows Key
 - Under the "Go upward and running" section, select the Windows Update choice.
-
Click the Run the troubleshooter button.
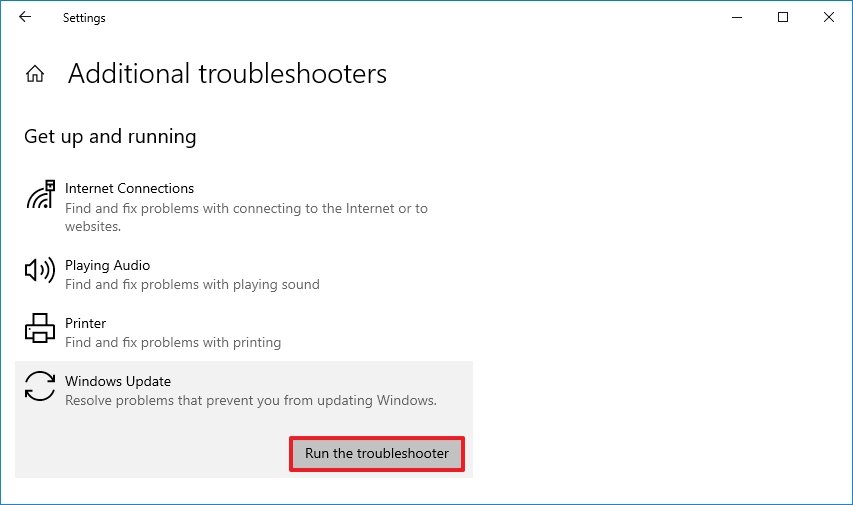 Source: Windows Cardinal
 -
Click the Apply this fix option (if applicative).
Quick note: If the "Apply this set" option is not available, it does not mean the trouble was not fixed. The tool will run a series of fixes, and if there is something else to repair, the choice to apply the ready will appear.
-
Continue with the on-screen directions.
-
Click the Close push.
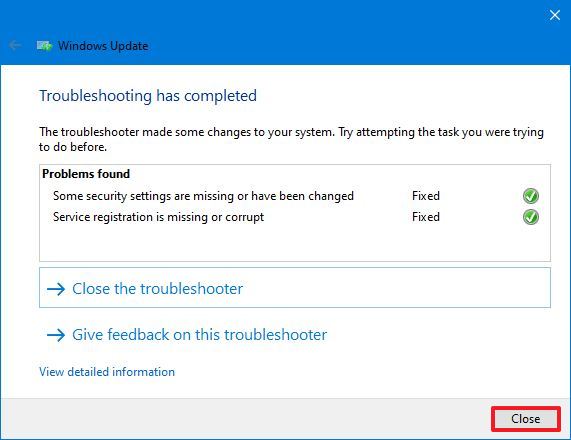 Source: Windows Primal
 - Restart the estimator.


Once you complete the steps, the Windows Update settings should at present operate normally to install Windows eleven.
If you get the fault 0xc1900223, information technology ways that in that location'due south an issue downloading the new version, and at that place's zero else y'all need to exercise. At a afterward time, the system will endeavour to download it again.
Fix fault 0x80073712 using Windows Update
When upgrading to Windows 11, you lot may encounter the error 0x80073712 message, which means that one or more required files are either missing or damaged.
Using the Deployment Servicing and Direction (DISM) tool, you can resolve this problem to restore the organisation files to a known skillful state.
To employ DISM to fix Windows Update, use these steps:
- Open Start.
- Search for Command Prompt, right-click the tiptop result, and select the Run as administrator option.
-
Type the following command and press Enter:
dism /Online /Cleanup-epitome /Restorehealth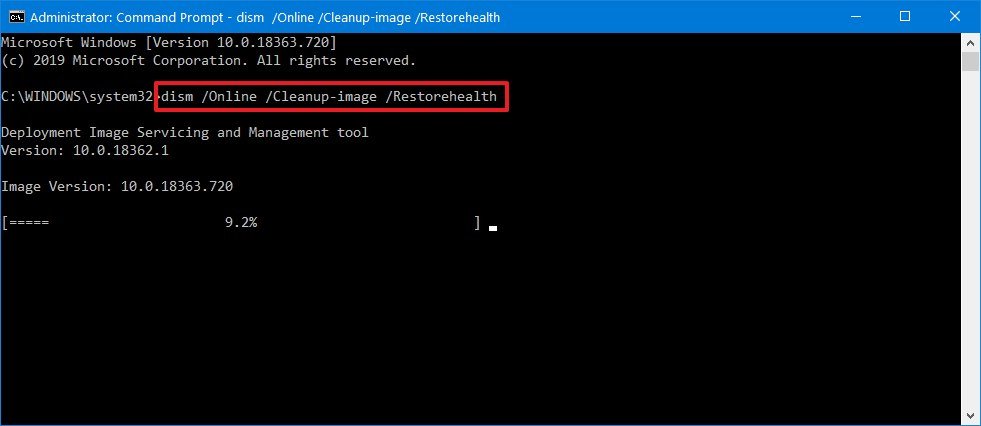 Source: Windows Central

After y'all complete the steps, the required files will exist repaired, and Windows Update should first working to download and install the first semi-annual update of Windows 10.
Fix error 0x800F0922 upgrading with Windows Update
If you employ Windows Update to upgrade your device, y'all may run into the error 0x800F0922, which means that the estimator cannot connect to the update servers or the Arrangement Reserved sectionalization is too small or out of space.
Disconnect VPN session
Commonly, you will see the fault 0x800F0922 trying to upgrade to Windows 11 when a VPN connection is active.
To disconnect the VPN session, utilise these steps:
- Click the network icon in the Taskbar.
- Select the VPN connexion.
-
Click the Disconnect push.
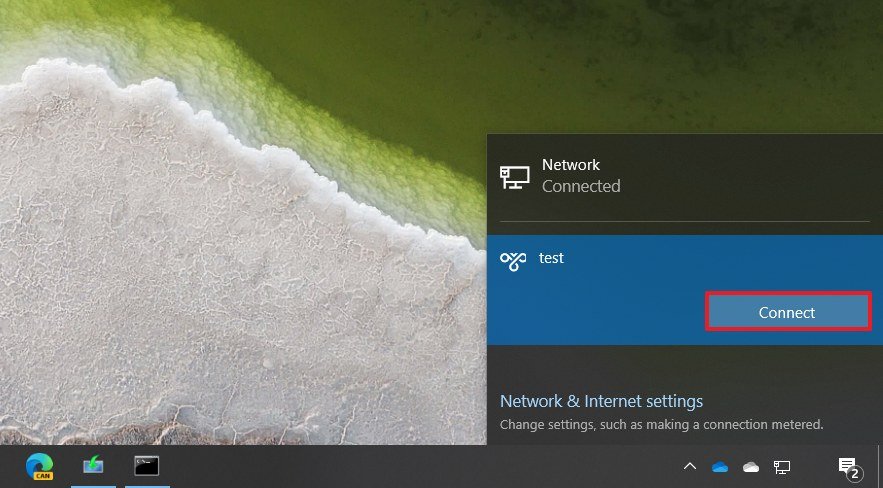 Source: Windows Central

If you use another VPN customer software, check the software vendor documentation for more specific instructions to disconnect the device.
Reside System Reserved segmentation
Third-party security software (for example, antivirus) can store information in the Organization Reserved partition that may crusade a halt in the Windows 11 installation.
Y'all can resolve this trouble by using a third-political party tool to resize the sectionalization to make it equal to or larger than 500MB. Alternatively, you can choose to perform a clean installation. This process volition not simply gear up the problem, but you will start the device with a new installation that tin can resolve other issues and better system performance.
How to fix USB flash drive problems installing Windows 11
If yous kickoff the Windows xi installation with a USB bootable media and setup fails, then one or more than files may exist missing or damaged. The quick set would be creating a new USB flash drive.
To create a Windows 11 USB flash drive, use these steps:
- Open Windows eleven download page.
-
Under the "Create Windows 11 Installation Media" department, click the Download now button to save the file on the device.
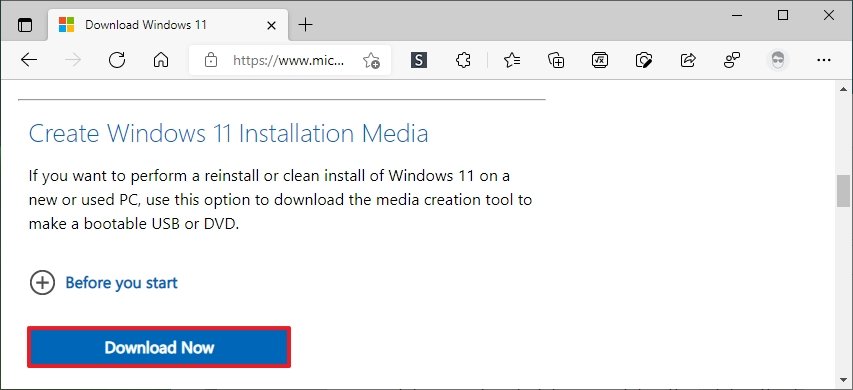 Source: Windows Central
 - Double-click the MediaCreationToolW11.exe file to launch the tool.
- Click the Take button to agree to the terms.
-
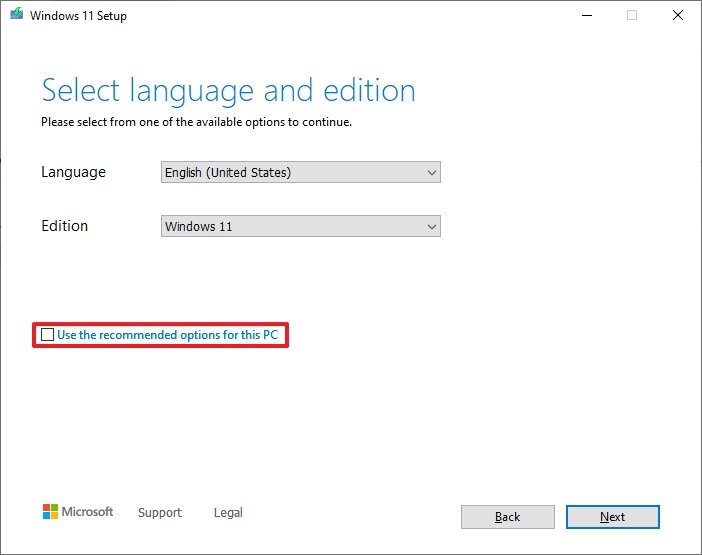
(Optional) Clear the Utilize the recommended options for this PC option.
 Source: Windows Central
 - Select the correct language and edition of Windows 11.
- Click the Next button.
-
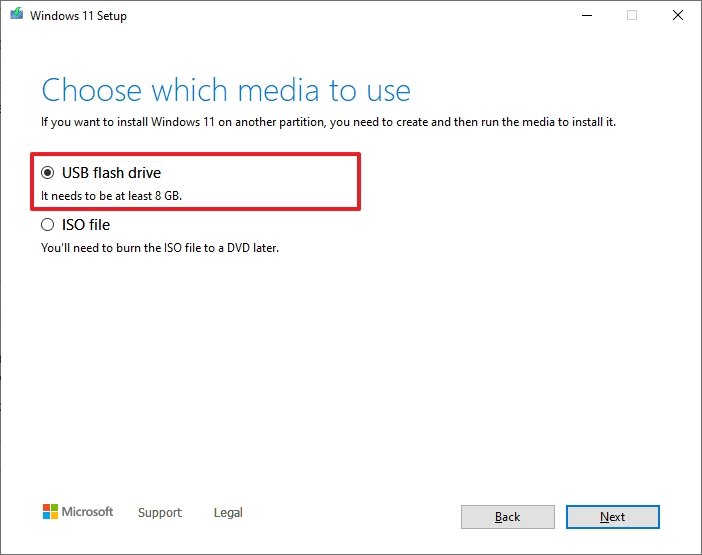
Select the USB flash bulldoze choice.
 Source: Windows Central
 - Click the Adjacent button
-
Select the USB flash bulldoze.
 Source: Windows Central
 Quick tip: If the device is not in the list, click the "Refresh drive listing" choice to make it available.
- Click the Next button.
- Click the Finish button.


After you consummate the steps, the Media Creation Tool volition create a new setup media with the files to install Windows 11.
How to fix setup bug installing Windows xi
If yous programme to use ane of the bachelor installation tools, the Windows 11 setup may stop unexpectedly with the mistake code 0x8007042B 0x4000D or 0x800700B7 0x2000A, which could indicate that another process is conflicting with the upgrade.
Yous can close the process in question and restart the setup to resolve the issue. Using a clean boot to restart the setup or remove the app causing the problem could help continue the installation.
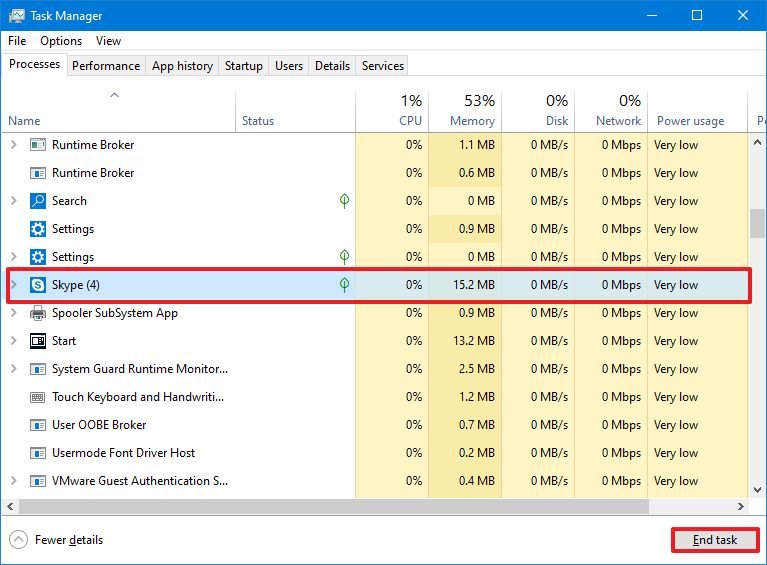
Terminate procedure in Task Director
To terminate a process or application with Task Manager, utilize these steps:
- Open Start.
- Search for Task Manager and click the top result to open the app.
- Click the More than details button.
- Select the app or process.
-
Click the Terminate chore button.
 Source: Windows Fundamental
 - Repeat steps No. iii and four to terminate the remaining apps.

After you consummate the steps, restart the setup and continue with the Windows 11 installation.
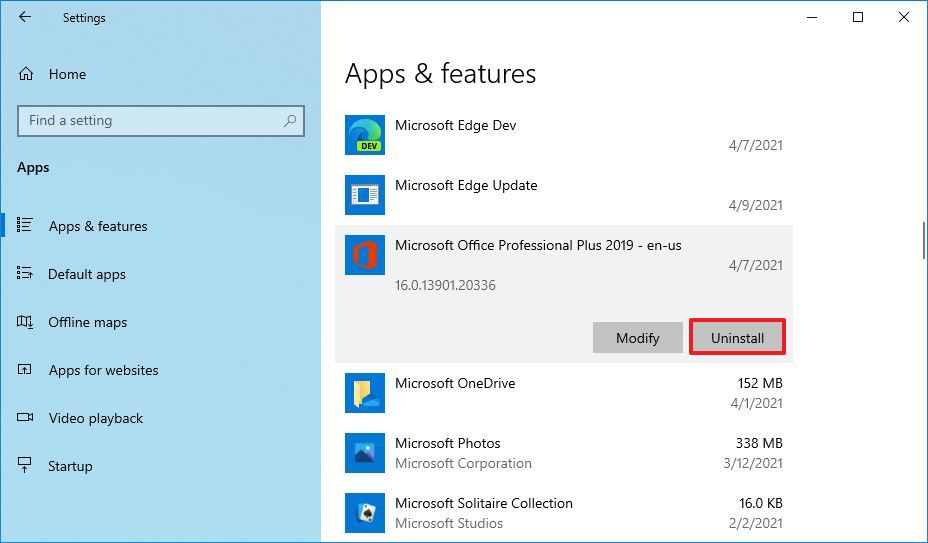
Uninstall a Windows app
To remove an app on Windows 10, use these steps:
- Open Settings.
- Click on Apps.
- Click on Apps & features.
- Select the app.
-
Click the Uninstall button.
 Source: Windows Central
 - Click the Uninstall push again.
- Go along with the on-screen directions (if applicable).

In one case yous complete the steps, the upgrade procedure should finish successfully.
How to fix Installation Assistant problems installing Windows 11
The Installation Banana is a tool that allows you to perform an in-place upgrade, merely sometimes information technology causes issues during the upgrade procedure.
Issues with the Installation Assistant are often related to network, and you may be able to resolve them using these tips:
- Close the tool, disconnect the network cable or disconnect the device from the wireless network using the network flyout on the Taskbar. Await a full minute, reconnect the estimator to the network, and reopen the Installation Assistant.
- Restart the device, reopen the Installation Banana, and proceed with the setup.
If the problem persists, download the Windows xi ISO file, double-click the file to mount it to File Explorer, and run the in-place upgrade to Windows 11 manually.
How to fix error code 0xC1900101 upgrading to Windows 11
The mistake codes starting with 0xC1900101 or 0x80090011 can indicate various problems during the Windows 11 upgrade process.
These are the common "0xC1900101" errors that you may come beyond upgrading to Windows 11:
- 0xC1900101 - 0x2000c
- 0xC1900101 - 0x20017
- 0xC1900101 - 0x30017
- 0xC1900101 - 0x30018
- 0xC1900101 - 0x3000D
- 0xC1900101 - 0x4000D
- 0xC1900101 - 0x40017
Cleanup storage infinite
The setup of Windows 11 requires several gigabytes of space to process the upgrade. If the device does not have plenty available space, y'all may see one of the 0xC1900101 error codes. You can go around this problem by using the "Storage" and "Apps & features" settings to free up infinite.
Yous tin can use this guide to find many tips to delete unnecessary files to free up storage space.
Disconnect devices
If the calculator has peripherals like external drives, printers, Bluetooth devices, USB devices, cameras, disconnect them before proceeding to reduce the chances of errors and other bug upgrading to Windows 11. You can always reconnect them after the upgrade.
Uninstall security apps
If there is a problem with 3rd-political party security software, y'all will likely see the fault codes 0xC1900101 0x20017 and 0xC1900101 0x30017.
The easiest manner to get around this problem is to uninstall the software in question.
To temporarily remove security applications, employ these steps:
- Open Settings.
- Click on Apps.
- Click on Apps & features.
- Select the security app.
-
Click the Uninstall push.
 Source: Windows Central
 - Click the Uninstall push button again.
- Continue with the on-screen directions.

Subsequently you complete the steps, go on with the upgrade. Subsequently the process, reinstall the software one more time.
Update device drivers
If the installation encounters a driver trouble, yous may see errors starting with 0xC1900101 or 0x80090011.
When downloading a driver update from the manufacturer support website, it'south recommended to utilise their instructions instead of the general steps as outlined beneath.
To update device drivers on your computer, use these steps:
- Open Settings.
- Click on Update & Security.
- Click on Windows Update.
-
Click the View optional updates option.
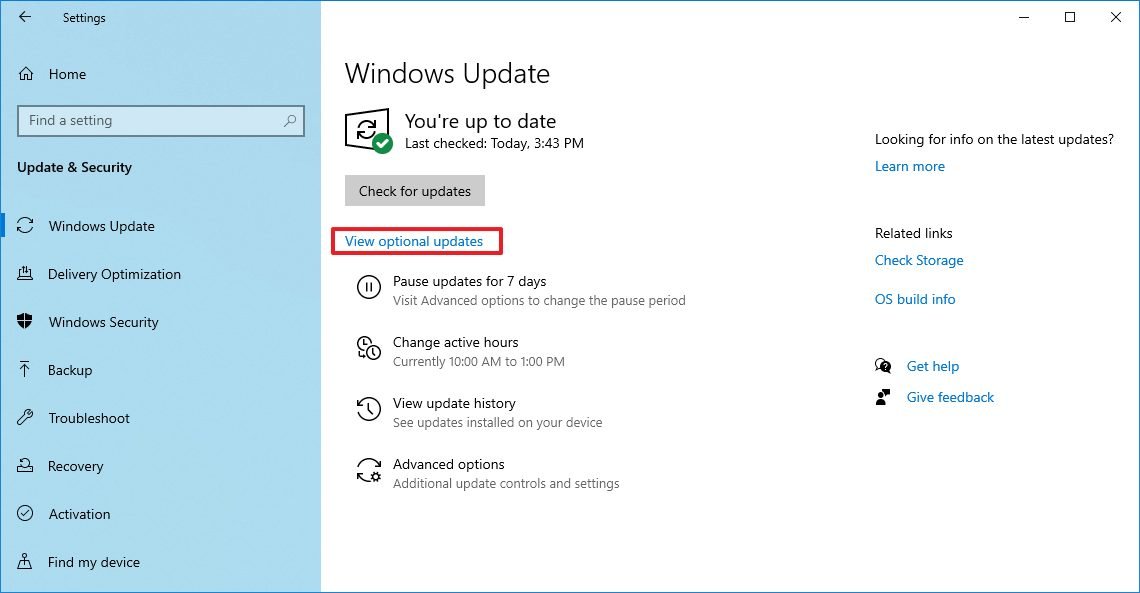 Source: Windows Central
 Quick note: This choice is only available when there is a commuter update through Windows Update.
- Click the Commuter updates listing to expand.
- Select the commuter to update.
-
Click the Download and install option.
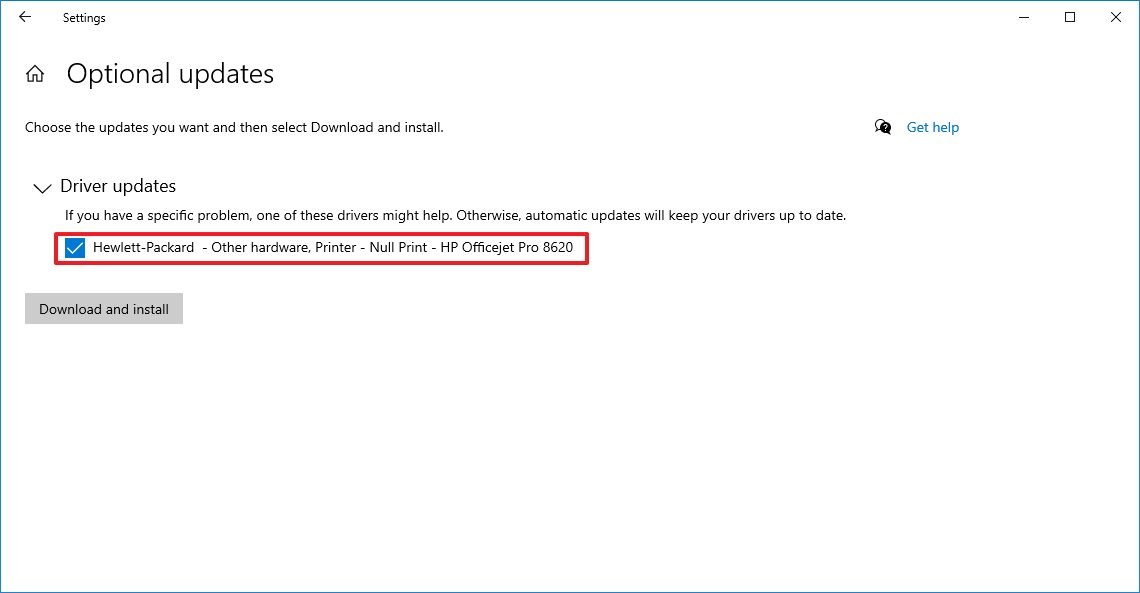 Source: Windows Fundamental


Once you lot consummate the steps, the driver update should resolve any errors preventing the installation of Windows 11.
Repair electric current installation
One of the 0xC1900101 errors could ascertain a problem with the current setup. Yous may be able to resolve the issue using the Deployment Servicing and Management (DISM) and the Organization File Checker (SFC) control-line tools to repair the installation.
You can use this guide to employ these tools to repair the Windows 10 installation.
Repair hard drive
Alternatively, you can also utilize the CHKDSK tool to repair logical and specific concrete errors on the installation bulldoze.
To utilise the CHKDSK tool, shut all running apps, and then use these steps:
- Open Start.
- Search for Control Prompt, right-click the top result, and select the Run as administrator option.
-
Type the following command and press Enter:
chkdsk/f c: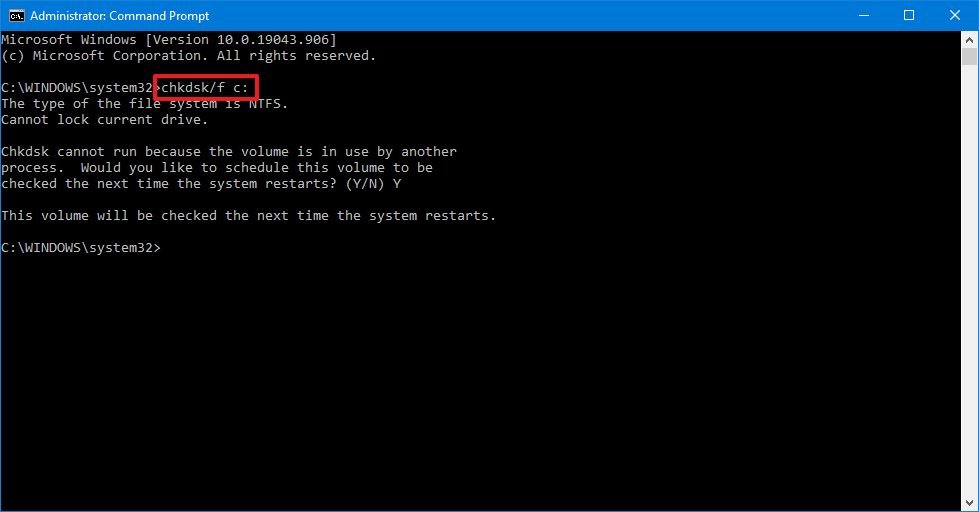 Source: Windows Cardinal
 - Type Y and press Enter to schedule a scan.
- Restart the estimator.

After the computer reboots, the CHKDSK tool will repair any bulldoze problems.
Make clean install upgrade
If the laptop or desktop computer continues to testify an fault code 0xC1900101, you should keep with the upgrade using a bootable USB to perform a clean install.
How to gear up error lawmaking 0x80070070 upgrading to Windows eleven
When you run into the error code 0x80070070 – 0x50011, 0x80070070 – 0x50012, or 0x80070070 – 0x60000, it means the computer doesn't take enough space to process the setup. Clearing upwards temporary files to make more room in the drive will usually resolve the trouble.
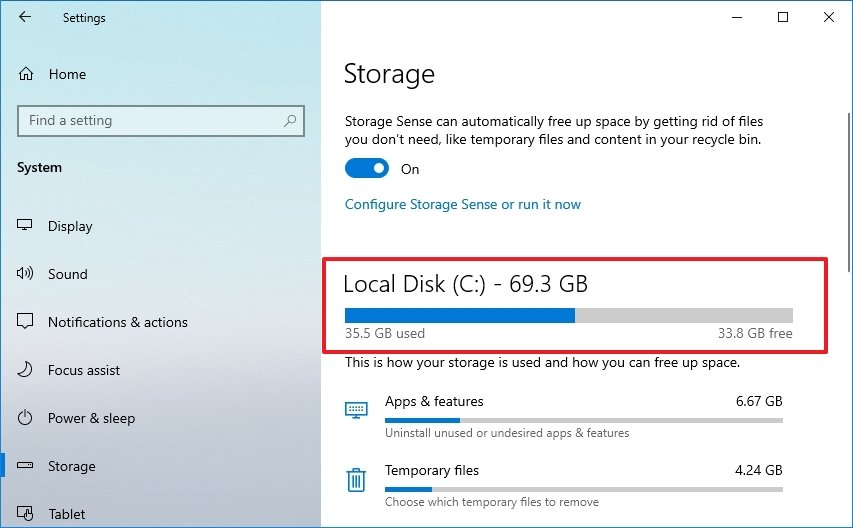
To free up storage space to continue with the update, use these steps:
- Open up Settings.
- Click on Organisation.
- Click on Storage.
-
Under the "Storage" section, click the Temporary files choice for the organisation drive.
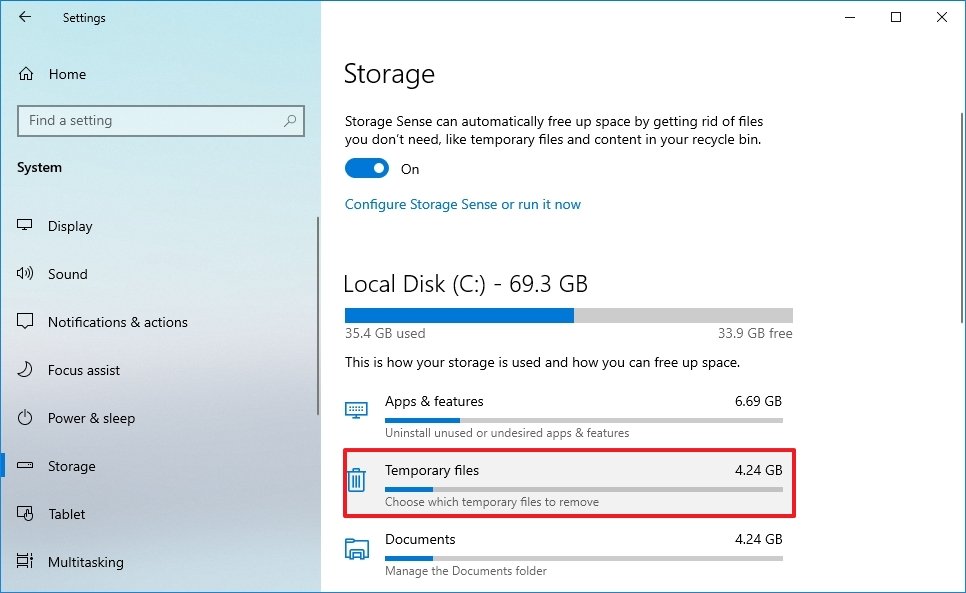 Source: Windows Primal
 -
Bank check the items to remove.
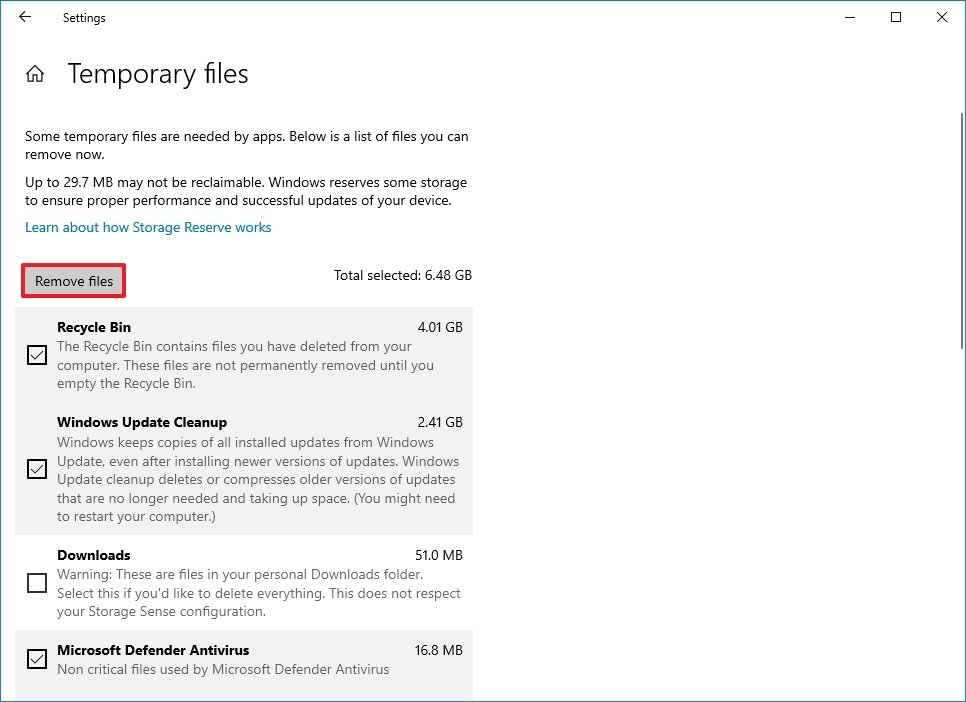 Source: Windows Central
 Quick tip: When selecting the items, do not choose the "Windows Setup temporary files" or "Windows ESD installation files" options since these are the upgrade files.
- Click the Remove files push.


Once you consummate the steps, continue with the upgrade to the start release of Windows eleven.
If you cannot make plenty room, you tin connect external storage (such every bit a USB flash drive or external hard bulldoze) with at least 16GB of infinite that the setup tin utilize equally temporary storage for the upgrade.
You can also apply this guide with more recommendations to clear up more than storage space on your computer.
How to fix fault lawmaking 0x80070002 0x20009 upgrading to Windows eleven
On Windows 11, the error code 0x80070002 0x20009 indicates an issue with the setup unable to locate the installation files.
You can get around this problem by disconnecting ANY external drive that isn't part of the installation, including USB flash drives (except the setup media) and hard drives, and restart the setup.
How to fix error code 0xC1900107 upgrading to Windows 11
In the rare instance that the fault lawmaking 0xC1900107 appears, it means that the device is trying to upgrade, but the cleanup of the previous installation is still pending. You lot tin set up this problem by deleting the copy of the previous setup or restarting the device.
To remove the previous installation files, use these steps:
- Open Settings.
- Click on Arrangement.
- Click on Storage.
-
Under the "Storage" department, click the Configure Storage Sense or run in now choice.
 Source: Windows Key
 - Nether the "Gratuitous up space at present" section, bank check the Delete previous versions of Windows option.
- Check the Delete previous versions of Windows option.
-
Click the Clean now button.
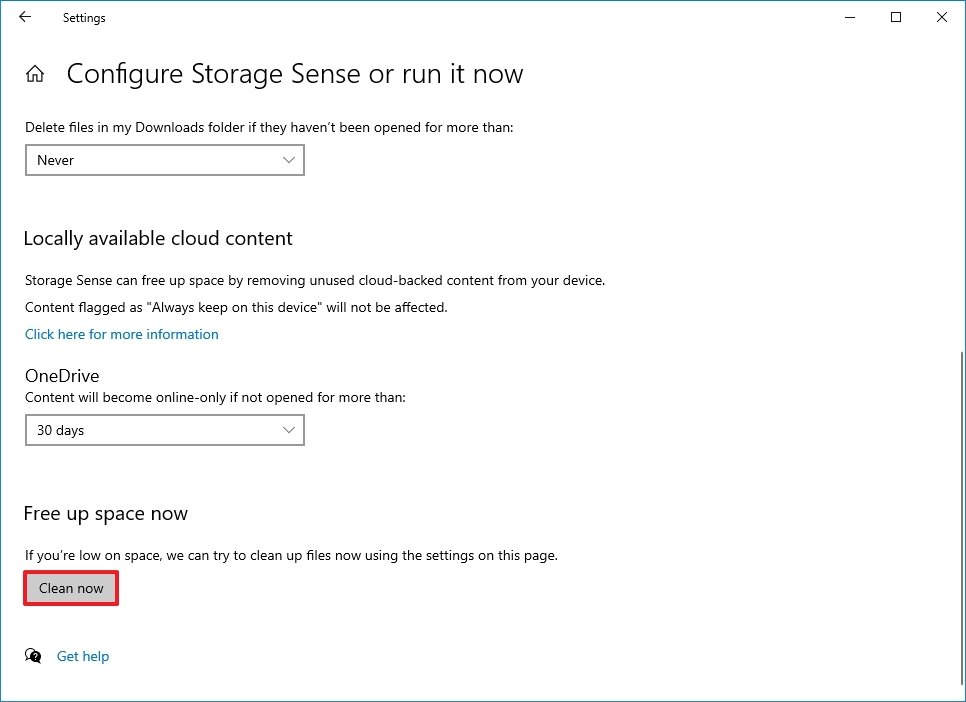 Source: Windows Central


Afterwards y'all complete the steps, the upgrade process to Windows 11 should be able to go along.
How to fix error code 0x800F0923 installing Windows eleven
If the device is running Windows 10, and you programme to upgrade to Windows 11, the mistake code 0x800F0923 indicates a compatibility trouble with a program or driver. Typically, this is a graphics commuter problem.
In the case this is a driver issue, installing the latest updates from the manufacturer back up website may help ready the problem. When you lot cannot find a newer commuter, it's possible to apply a beta version since it might include the solution.
If the driver doesn't accept any new updates, you could remove it to continue installing. And so you tin reinstall it after the Windows 11 upgrade.
App compatibility solution
When the trouble is an awarding, you have two choices: install a newer update or remove information technology before continuing with the setup.
To uninstall apps, employ these steps:
- Open Settings.
- Click on Apps.
- Click on Apps & features.
- Select the incompatible app.
-
Click the Uninstall button.
Source: Windows Central - Click the Uninstall push again.
- Continue with the on-screen directions (if applicable).
One time you complete the steps, proceed with the installation of Windows 11. After the process, you can install the applications again.
Driver compatibility solution
To uninstall a device driver, utilize these steps:
- Open Get-go.
- Search for Device Director, and click the pinnacle event to open the app.
- Expand the branch with the device having issues.
-
Right-click the component and select the Uninstall device option.
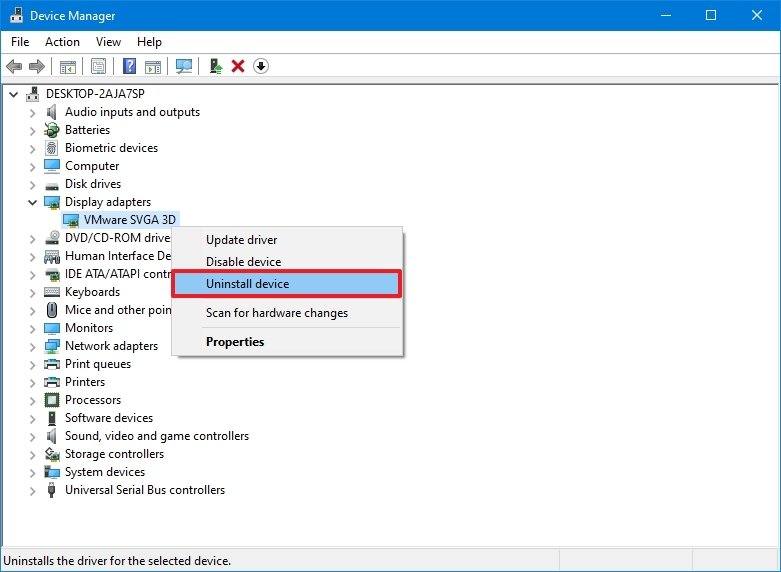 Source: Windows Central
 - Click the Uninstall button again.

After y'all complete the steps, the driver will exist removed, and the installation should go through without problems.
How to fix error code 0xC1900208 upgrading to Windows eleven
When upgrading to Windows xi, the error lawmaking 0xC1900208 - 0x4000C indicates a conflict with an awarding. The quick solution is to uninstall the app in question.
To uninstall a conflicting app, use these steps:
- Open Settings.
- Click on Apps.
- Click on Apps & features.
- Select the incompatible application.
-
Click the Uninstall button.
Source: Windows Central - Click the Uninstall button again.
- Go on with the on-screen directions to remove the app (if applicable).
Once you lot consummate the steps, go along with the Windows 11 setup.
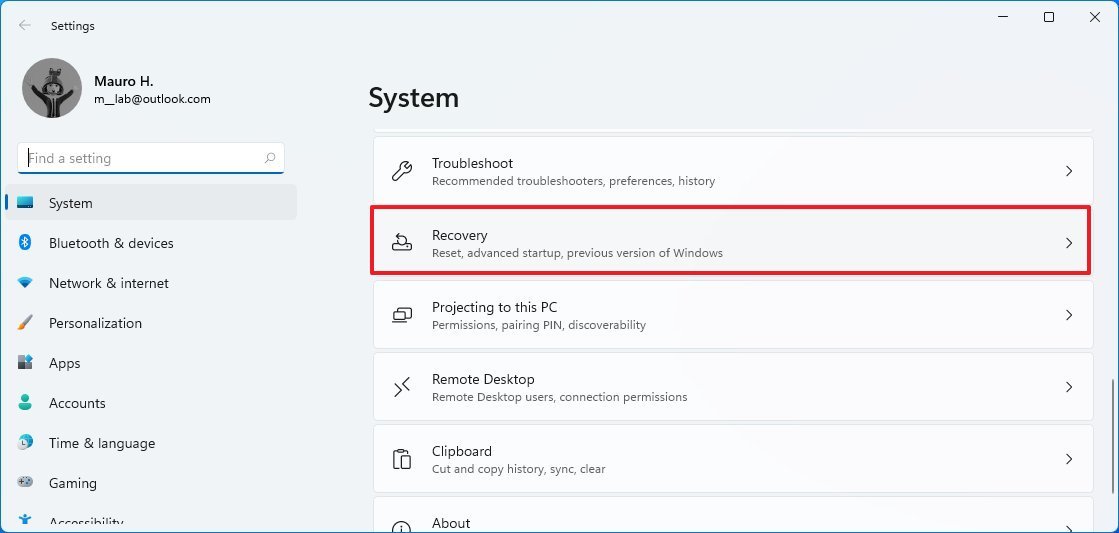
How to fix black screen problem on Windows xi
A black screen is a common consequence during or after a new installation, and many times, it'south the graphic driver or another problem with the upgrade process.
Since it tin be difficult to find out the root of the problem, the easiest way to deal with this situation is to curl back to the previous version.
To uninstall and roll back to the previous version of Windows, utilize these steps:
- Open up Settings.
- Click on System.
-
Click the Recovery page on the right side.
 Source: Windows Central
 -
Under the "Recovery options" section, in the "Previous version of Windows" settings, click the Go back button.
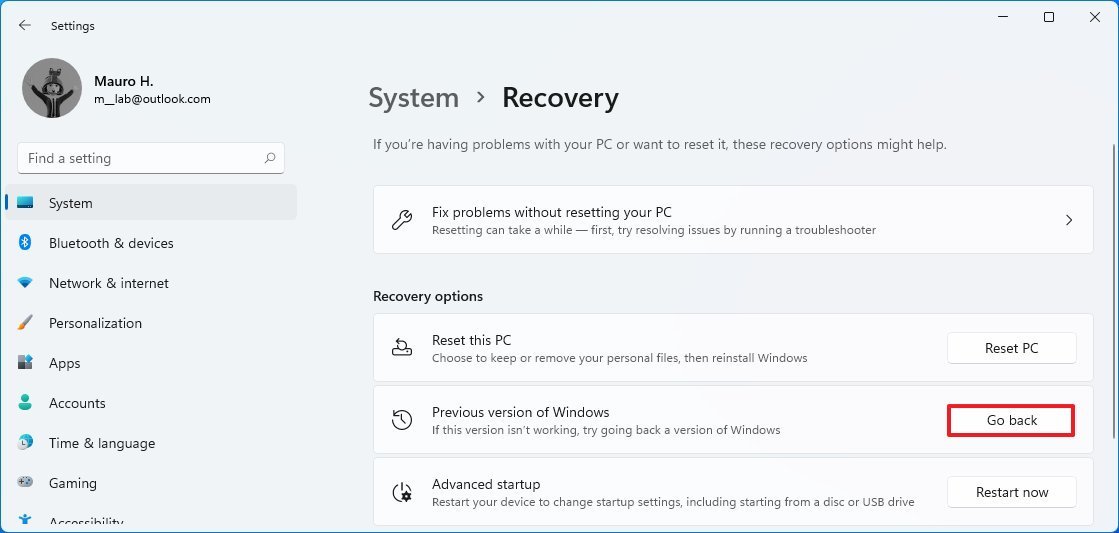 Source: Windows Central
 Quick note: If the option is not available, you lot may need to use the reinstallation process equally outlined below.
-
Select any of the reasons bachelor.
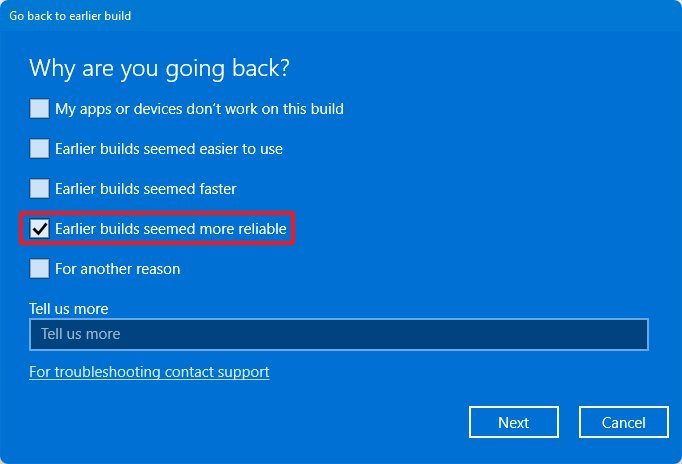 Source: Windows Primal
 - Click the Next push button.
-
Click the No, thanks button.
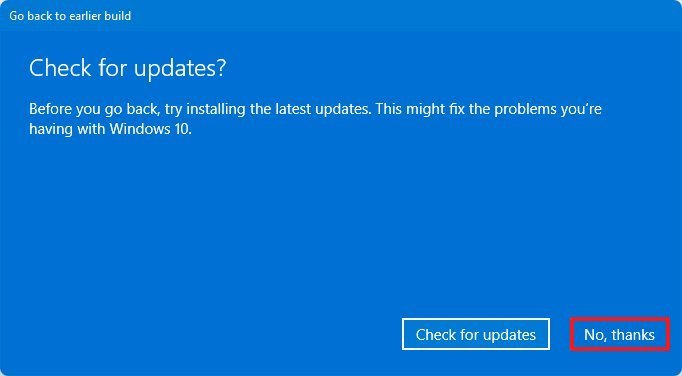 Source: Windows Central
 -
Click the Next button.
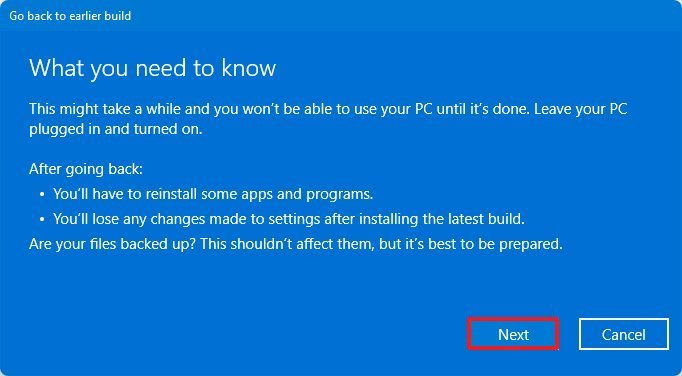 Source: Windows Primal
 -
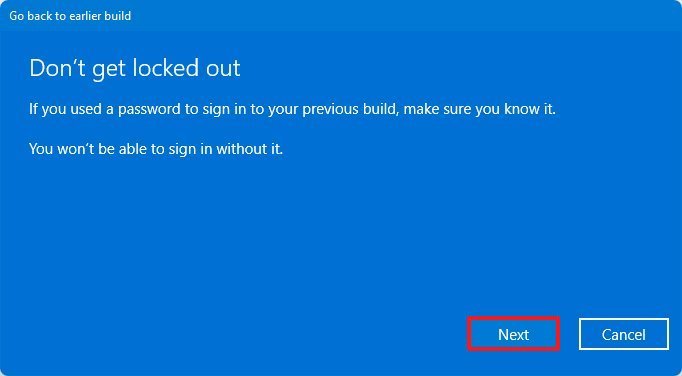
Click the Next button over again.
 Source: Windows Central
 -
Click the Get back to earlier build button.
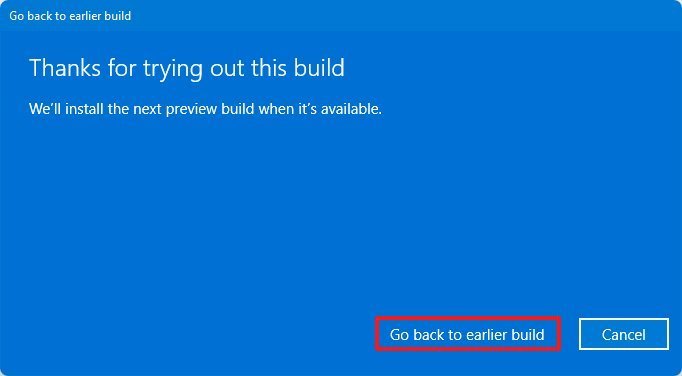 Source: Windows Central


After you complete the steps, yous should wait until a new update that fixes the problem releases to try the upgrade again.
How to prepare error completing installation of Windows eleven
During the upgrade from Windows 10 to Windows xi, yous may come across ii messages that are not specific, only they indicate that something went wrong:
- Fault: We couldn't complete the updates. Undoing changes. Don't turn off your computer.
- Error: Failure configuring Windows Updates. Reverting changes.
If you get one of these messages, yous tin determine the error code in the Windows Update settings, which you can so use to enquiry online and find the appropriate solution.
To check the error lawmaking preventing the version 21H1 installation, use these steps:
- Open Settings.
- Click on Update & Security.
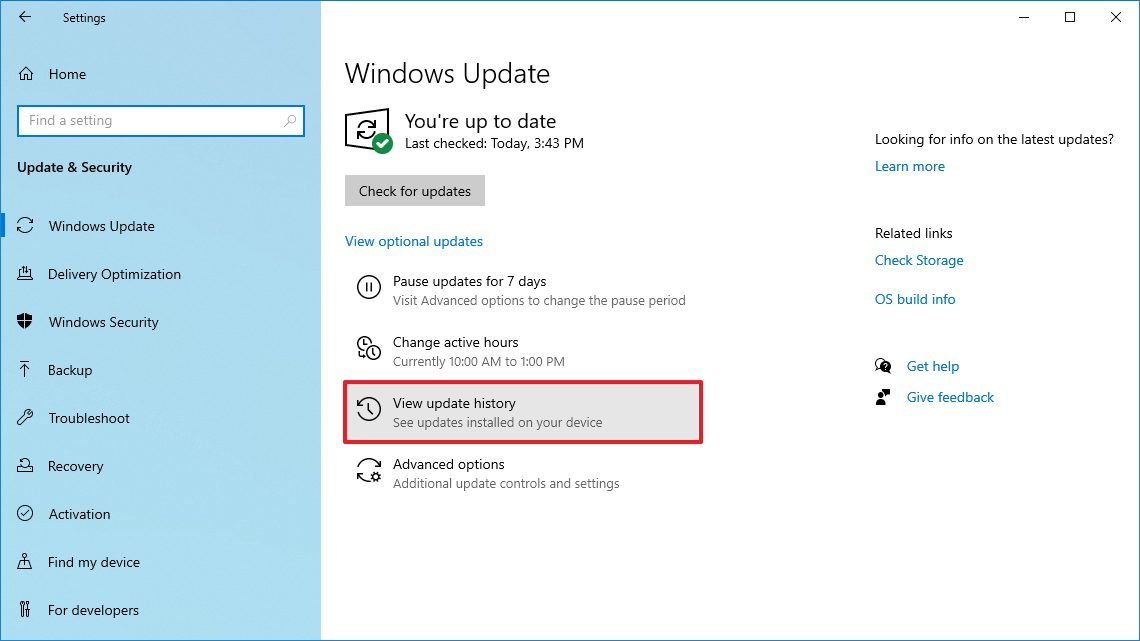
- Click on Windows Update.
-
Click the View your update history option.
 Source: Windows Central
 -
Check the fault code next to the failed update.
 Source: Windows Cardinal


Once you lot complete the steps, use the error lawmaking to enquiry online and follow the instructions to fix it (if applicable).
How to fix Wi-Fi and Ethernet adapter problems on Windows 11
After upgrading to a new version of Windows, it's mutual to encounter issues with Ethernet and Wi-Fi adapters. Sometimes, the connection may be no longer reliable, and other times, it could break completely.
While a networking problem can be caused by many factors like drivers, settings, wireless betoken, cablevision, switch, router, and Isp (ISP), information technology could also be a bug with the latest release of Windows 11.
If you lot recently upgraded the computer, the problem could be a commuter or configuration, which you might be able to fix using the network troubleshooter or the network reset feature.
Network troubleshooter
To fix network adapter problems after upgrading to Windows 11, utilize these steps:
- Open Settings.
- Click on Organization.
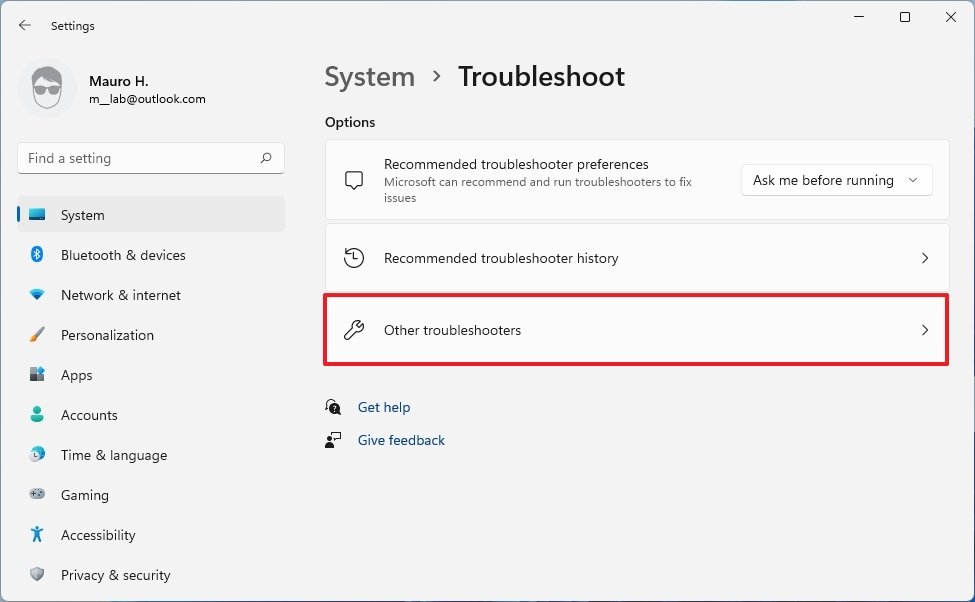
- Click the Troubleshoot folio on the right side.
-
Click the Other troubleshooters setting.
 Source: Windows Central
 -
Under the "Other" section, click the Run button for the "Network Adapter."
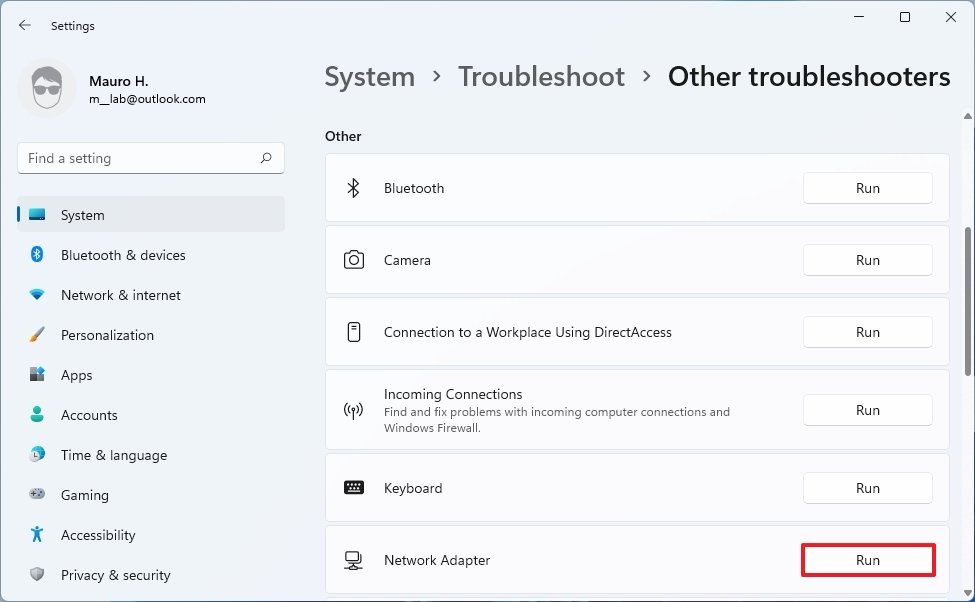 Source: Windows Central
 - Keep with the on-screen directions (if applicable).


Once yous consummate the steps, the device should reconnect to the network equally usual.
Network reset
To reset network adapters on Windows xi to their default settings, use these steps:
- Open Settings.
- Click on Network & internet.
-
Click the Advanced network settings page on the right side.
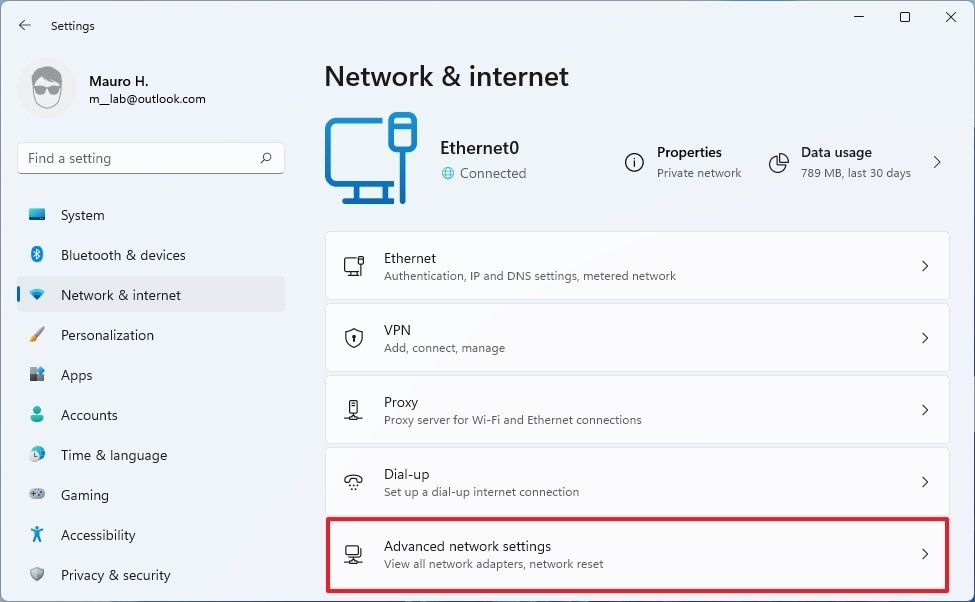 Source: Windows Central
 -
Nether the More than settings section, click the Network reset setting.
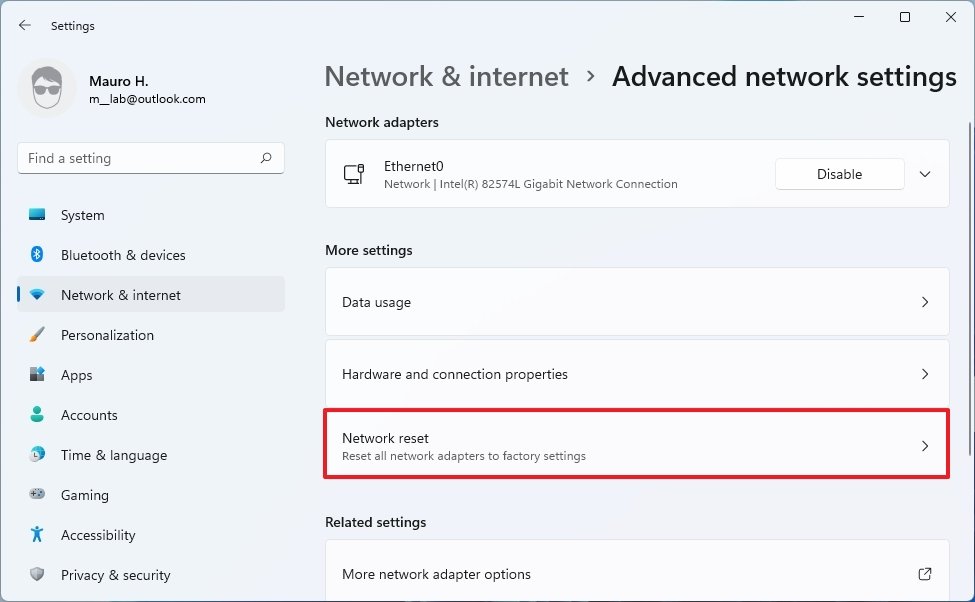 Source: Windows Fundamental
 -
Click the Reset now button.
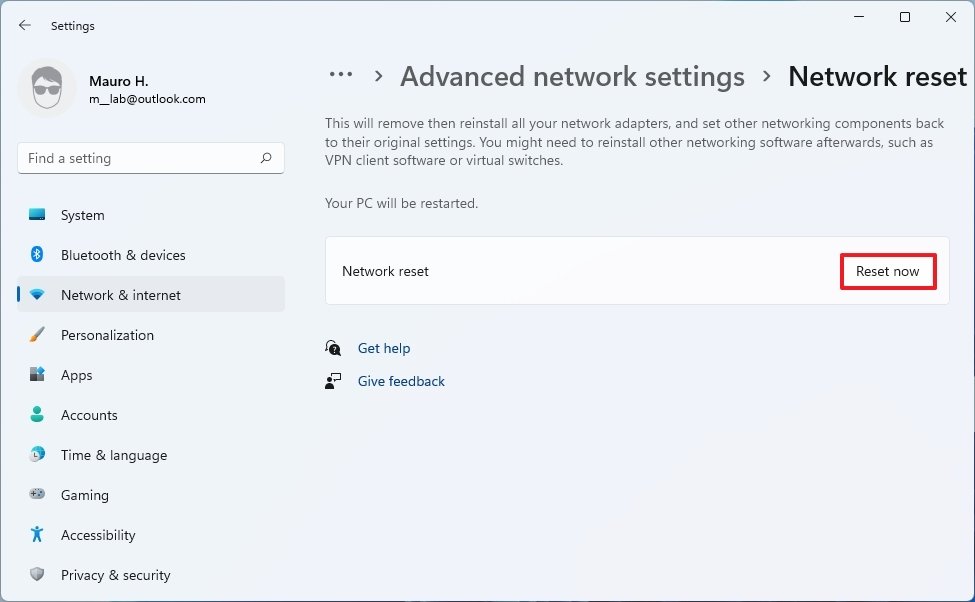 Source: Windows Primal
 - Click the Yeah button.


Subsequently you complete the steps, Windows eleven will reinstall all the adapters and restore the default settings. If you are using a wireless connectedness, you may need to re-enter the password to connect.
How to ready VirtualBox non working on Windows eleven
If you apply VirtualBox, virtual machines won't start later the upgrade to Windows xi, and you may receive an error. The mistake occurs because of an incompatible issue between VirtualBox and Windows 11 when you have Hyper-Five installed on the computer. Microsoft is enlightened of the problem, and the visitor confirms that Oracle is expected to release an update to fix this trouble quondam in October.
As a result of this problem, Microsoft is currently placing an upgrade hold for devices with VirtualBox and Hyper-V installed.
Disable Hyper-V
If you have already upgraded to Windows 11, you can get around this problem past disabling Microsoft Hyper-Five with these steps:
- Open First.
- Search for Turn Windows features on or off and click the meridian upshot to open the Windows Features app.
-
Clear the Hyper-V feature.
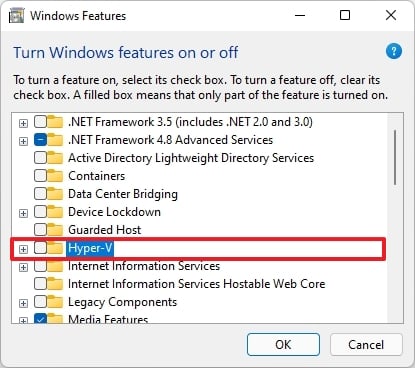 Source: Windows Central
 - Click the OK push button.
- Click the Restart at present push button.

One time you lot complete the steps, you should be able to run the virtual machines in VirtualBox.
In the instance that the Windows 11 upgrade is non bachelor on your computer because of this problem, you tin either disable Hyper-V (above steps) or uninstall VirtualBox (steps below) and then bank check for updates to receive the new version.
Uninstall VirtualBox
To uninstall VirtualBox, use these steps:
- Open Settings.
- Click on Apps.
- Click on Apps & features.
-
Select the Oracle VM VirtualBox detail.
 Source: Windows Central
 - Click the Uninstall button.
- Click the Uninstall button over again.
- Continue with the on-screen directions to complete the uninstall.

After you complete the steps, yous should now be able to upgrade to Windows eleven.
How to fix Intel Killer networking issues on Windows eleven
After upgrading to Windows 11, devices using the Intel "Killer" networking software may experience drops on UDP (User Datagram Protocol) packets under certain atmospheric condition, making websites load slower and streaming videos may comport unexpectedly.
If y'all are dealing with this problem, Microsoft is expected to release a set during the next security update scheduled for October 12.
In the case that you can't wait for the gear up considering this is impacting the overall experience, y'all may want to consider rolling back to the previous version until these and other issues get resolved.
To uninstall and scroll back to the previous version of Windows, use these steps:
- Open Settings.
- Click on Organization.
-
Click the Recovery page on the right side.
Source: Windows Central -
Under the "Recovery options" section, in the "Previous version of Windows" settings, click the Get dorsum button.
Source: Windows Central Quick note: If the option is not available, you may need to use the reinstallation process as outlined beneath.
-
Select whatever of the reasons available.
Source: Windows Central - Click the Adjacent button.
-
Click the No, thanks button.
Source: Windows Central -
Click the Side by side button.
Source: Windows Central -
Click the Side by side push button again.
Source: Windows Central -
Click the Get back to earlier build button.
Source: Windows Central
After you lot complete the steps, y'all should wait and upgrade again after the problem is fixed.
How to set up Cốc Cốc browser non working on Windows xi
Microsoft has as well institute a compatibility consequence with the device that has the Cốc Cốc browser. Every bit a result, the company is putting an upgrade concur until the trouble is fixed.
If the free upgrade to Windows xi is being offered through Windows Update, and you take happened to use this browser. You shouldn't endeavor to upgrade using the Installation Assistant or Media Creation Tool until the problem is resolved. However, you tin can get around this problem by temporarily uninstalling the browser to remove the block and proceed with the upgrade.
To uninstall the Cốc Cốc browser, apply these steps:
- Open Settings.
- Click on Apps.
- Click on Apps & features.
- Select the Cốc Cốc detail.
- Click the Uninstall button.
- Click the Uninstall push button again.
- Go along with the on-screen directions to complete the uninstall (if applicable).
Once y'all complete the steps, you lot should be updated to upgrade to Windows eleven. Later the trouble is stock-still, you can install the browser again.
How to fix Installation Assistant mistake 0x8007007F on Windows 11
Although the recommended way to upgrade to Windows 11 is using the Windows Update settings, it's besides possible to install this new version with the new "Installation Banana," which, like the Update Assistant for Windows 10, it allows you to skip this queue to go along with the upgrade immediately. Nevertheless, the app isn't working for anybody as expected, every bit it appears (via Reddit and WindowsLatest) that it'due south failing with error 0x8007007F.
Microsoft hasn't best-selling error 0x8007007F as a problem with Windows 11, but you tin can rapidly get effectually this by mounting the Windows xi ISO file and launching the setup process from File Explorer.
To download the Windows eleven ISO file direct from the Microsoft support website, use these steps:
- Open up Windows 11 download page.
-
Under the "Download Windows 11 Disk Image (ISO)" section, select the Windows 11 pick.
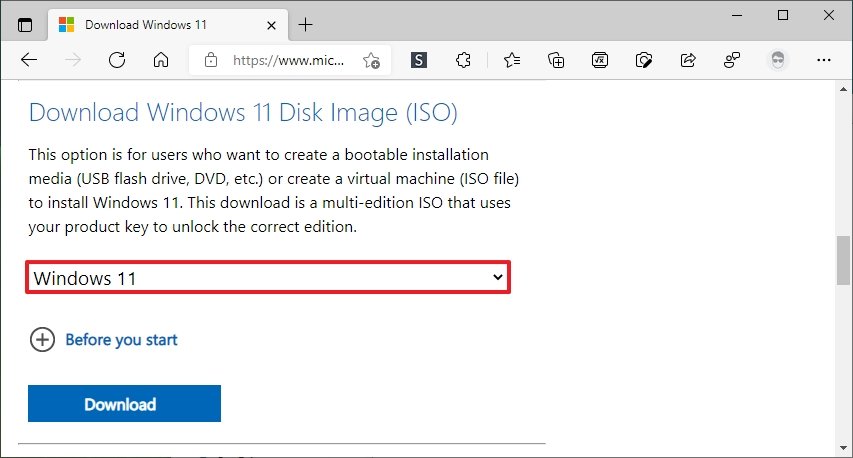 Source: Windows Fundamental
 - Click the Download button.
-
Select the ISO language.
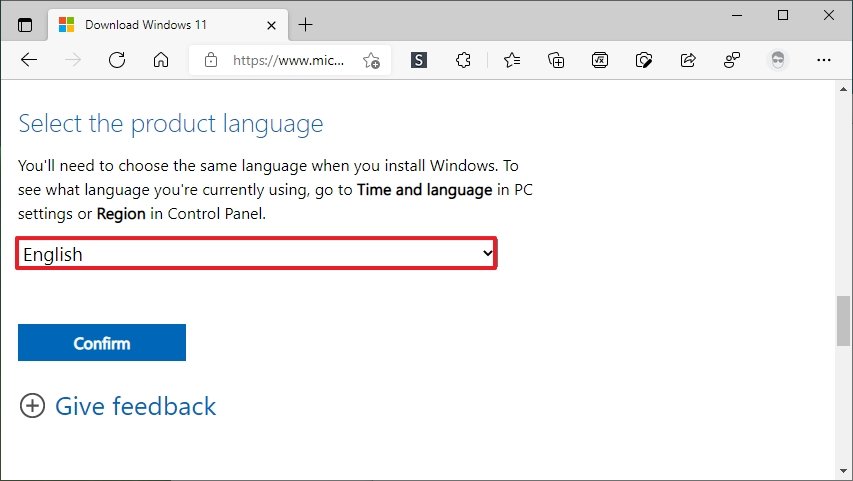 Source: Windows Fundamental
 - Click the Ostend button.
-
Click the 64-flake Download button.
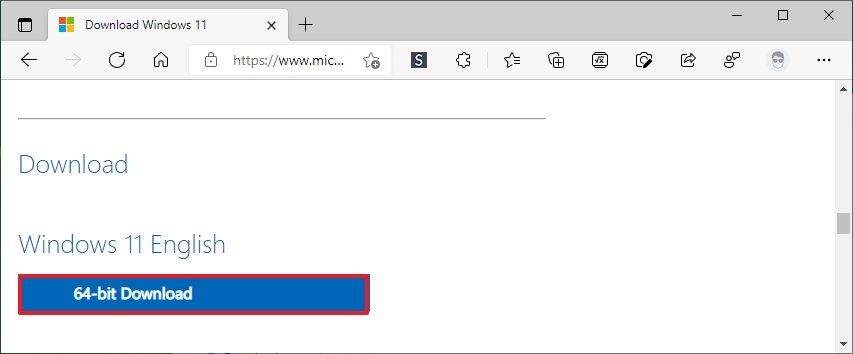 Source: Windows Key
 - Double-click the ISO file to mount it in File Explorer.
- Double-click the Setup.exe to launch the installer.


After you consummate the steps, proceeded with the on-screen directions to upgrade the device to Windows 11.
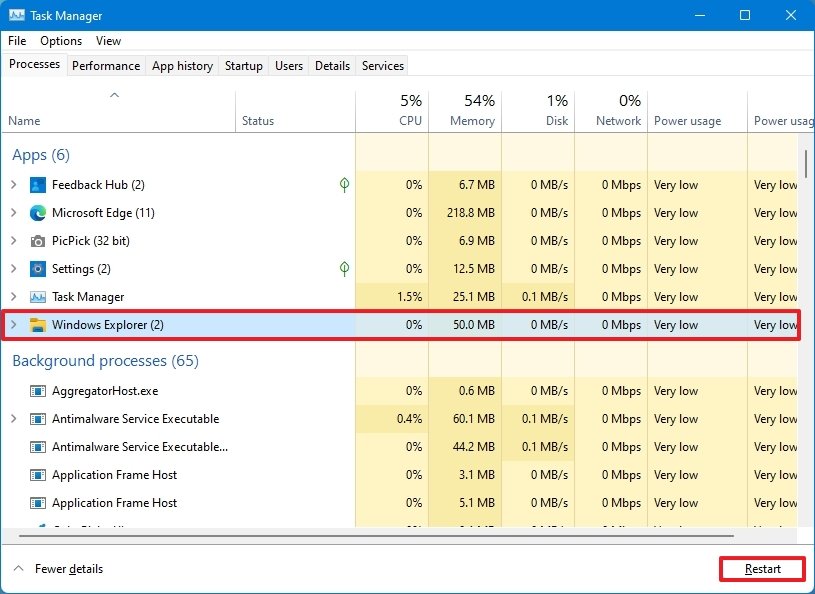
How to fix File Explorer memory leak on Windows xi
After the upgrade to Windows xi, a small number of users accept been reporting a memory leak problem with File Explorer. Basically, later on opening and closing File Explorer, the procedure fails to return the borrowed space in retentiveness, causing the system to run out of retentiveness, in some cases.
Microsoft hasn't acknowledged the memory leak every bit a problem with the new version of the Os. All the same, if yous are noticing system resources issues, in that location are a few things you tin can do, including restarting the explorer.exe process, restarting the computer, and if the problem continues, y'all can still all scroll back to the previous version.
Restart File Explorer process
To restart the File Explorer process to mitigate the memory leak, use these steps:
- Right-click the Start push and select the Task Director choice.
- Click the More than details button (if applicable).
- Click the Processes tab.
-
Select the Windows Explorer process.
 Source: Windows Central
 - Click the Restart push button.

Once you consummate the steps, File Explorer will restart, temporarily mitigating the problem.
Restart figurer
To restart your computer, employ these steps:
- Click the Beginning button.
- Click the Power button and select the Restart option.
Afterwards you complete the steps, the system resources should come up dorsum to normal.
If you are experiencing the problem again, repeat either of the two methods, or you should consider rolling back to the previous installation.
Rollback to the previous version
To uninstall and curlicue back to the previous version, use these steps:
- Open Settings.
- Click on System.
-
Click the Recovery page on the right side.
Source: Windows Central -
Nether the "Recovery options" section, in the "Previous version of Windows" settings, click the Get back button.
Source: Windows Primal -
Select whatsoever of the reasons bachelor.
Source: Windows Key - Click the Next push.
-
Click the No, thanks button.
Source: Windows Central -
Click the Next push button.
Source: Windows Central -
Click the Next push again.
Source: Windows Key -
Click the Go dorsum to before build button.
Source: Windows Fundamental
In one case you lot consummate the steps, you should wait a niggling longer before upgrading again.
How to gear up AMD operation issue on Windows 11
On the visitor's back up website, AMD has confirmed that there's a memory issue with various processors (including Ryzen chips) and Windows 11 that tin can impact operation up to 5 percentage on some applications and upward to 15 percent in some games.
AMD and Microsoft are working to set up these bug, and they are expected to go available by the end of October. If you have a calculator with an AMD processor, it'due south recommended to wait before the upgrade. However, if you have already upgraded to Windows 11, and this issue negatively affects your feel, you may consider uninstalling the new version and revert to your previous installation.
To uninstall Windows 11 to resolve the performance issue, use these steps:
- Open Settings.
- Click on System.
-
Click the Recovery page on the right side.
Source: Windows Central -
Under the "Recovery options" section, in the "Previous version of Windows" settings, click the Get back push.
Source: Windows Fundamental -
Select any of the reasons available.
Source: Windows Fundamental - Click the Next button.
-
Click the No, cheers button.
Source: Windows Central -
Click the Next button.
Source: Windows Central -
Click the Next button once again.
Source: Windows Primal -
Click the Go back to earlier build button.
Source: Windows Central
After you complete the steps, the computer should no longer feel performance issues.
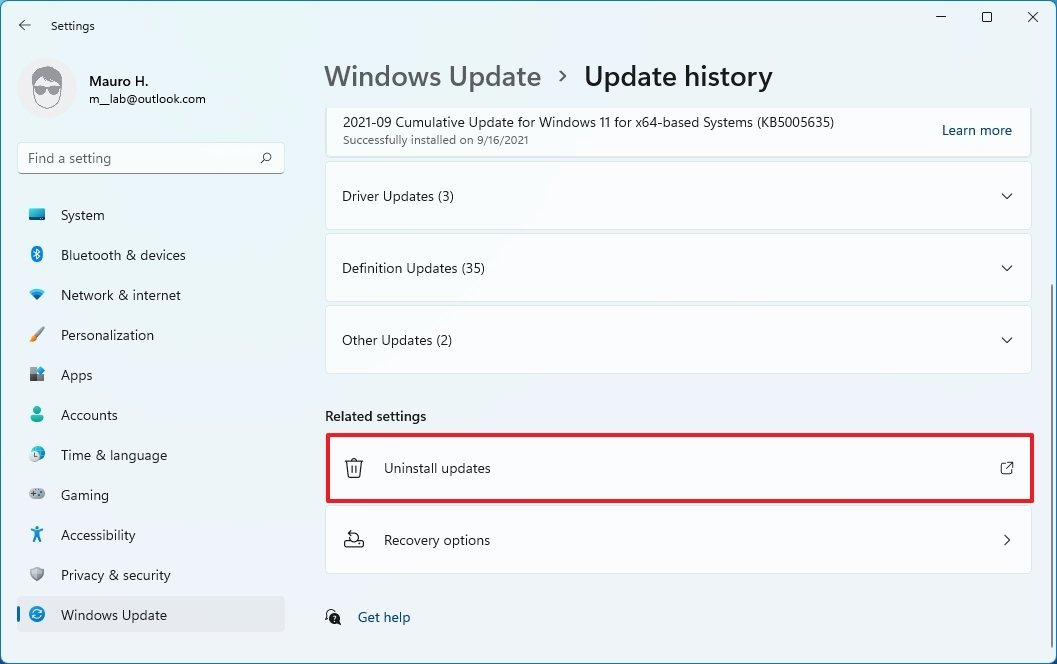
How to fix Start bill of fare broken on Windows xi
After installing Windows 11, a number of users have reported seeing the classic Start bill of fare and Taskbar available on Windows 10, instead of the redesigned menu and Taskbar.
The problem seems but to be affecting a pocket-size number of users, and if this is happening on your device, some users pointed out that removing the most recent update or creating a new account may solve the trouble.
Uninstall updates
To remove the most recent update, use these steps:
- Open Settings.
- Click on Windows Update.
- Click the Update History page from the right side.
-
Under the "Related settings" department, click the Uninstall updates option.
 Source: Windows Primal
 -
Select the virtually recent update.
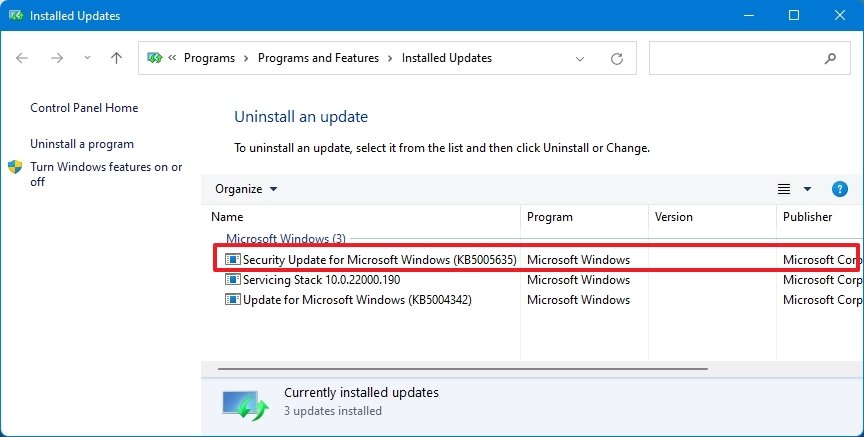 Source: Windows Central
 - Click the Uninstall push button.
- Click the Yes push button.


In one case you complete the steps, restart the reckoner to apply the changes.
Create a new local account
To create a new business relationship to fix the Get-go carte, use these steps:
- Open up Settings.
- Click on Accounts.
- Click the Family & other users page from the correct side.
-
Under the "Other users" section, click the Add business relationship push button.
 Source: Windows Central
 -
Click the I don't have this person's sign-in information choice.
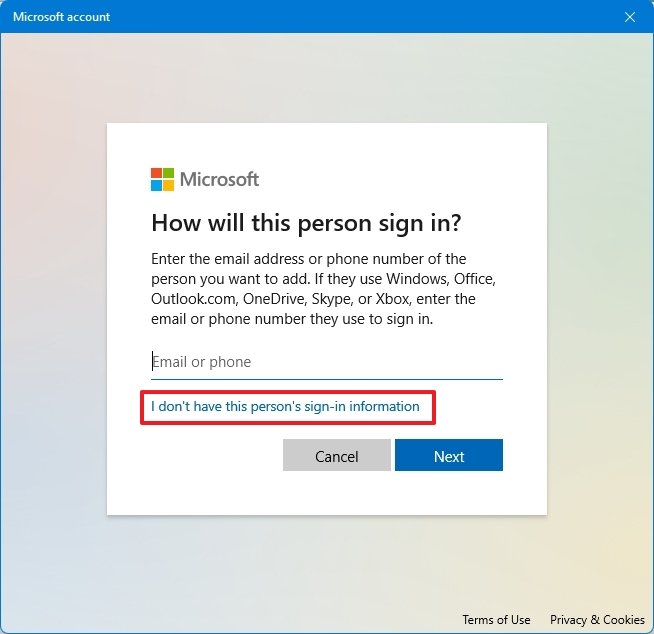 Source: Windows Central
 -
Click the Add a user without a Microsoft account selection.
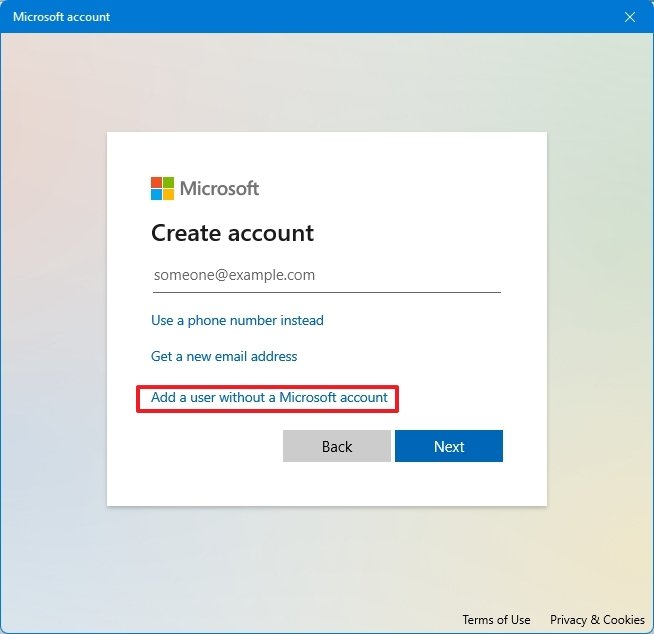 Source: Windows Central
 -
Create an account name and countersign.
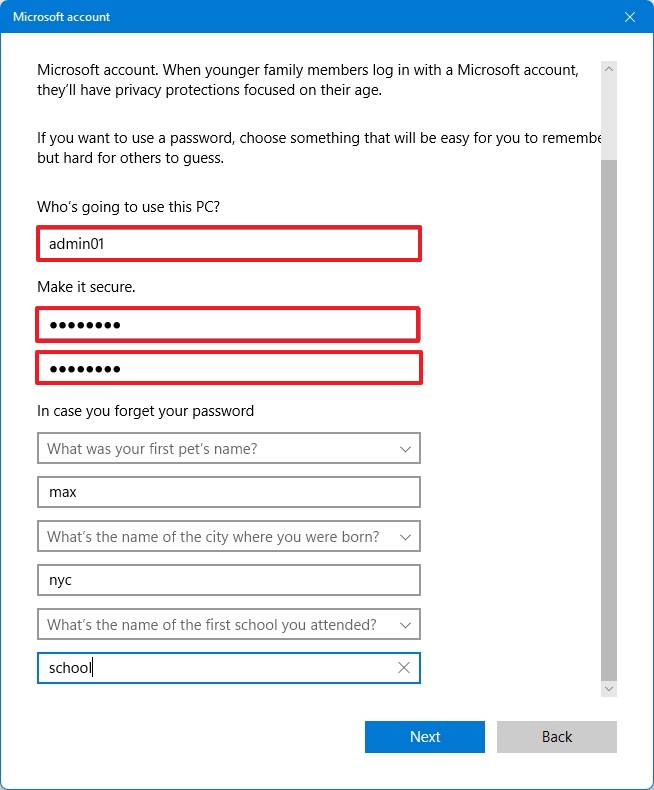 Source: Windows Central
 - Complete the security questions.
- Click the Next button.
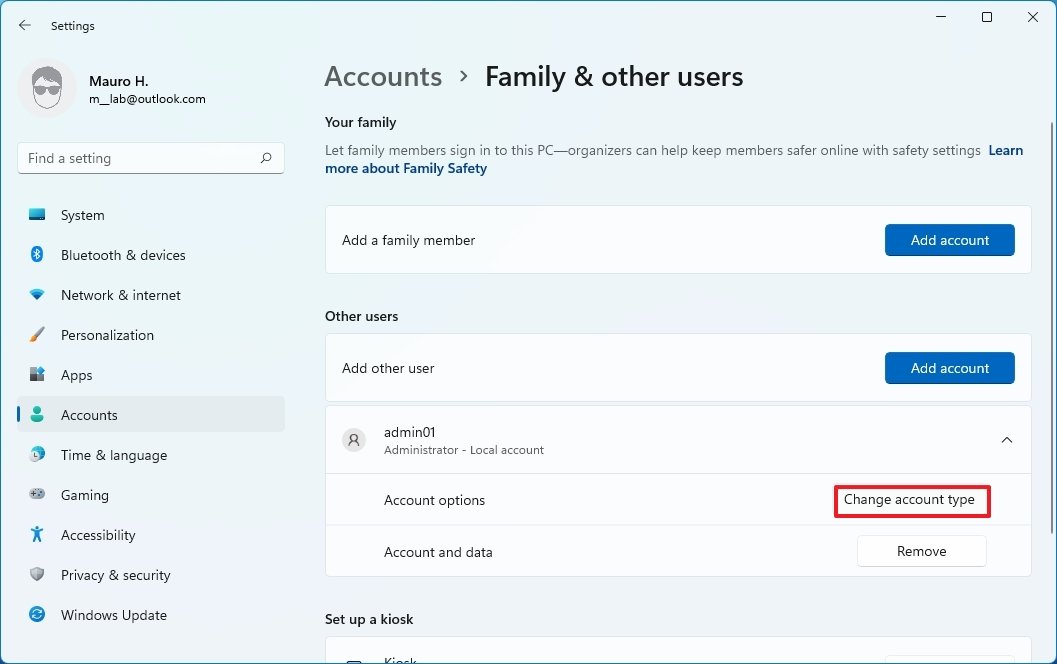
- Click the newly created account.
-
Click the Change business relationship type button.
 Source: Windows Key
 -
Employ the "Account blazon" drop-downward card and select the Administrator option.
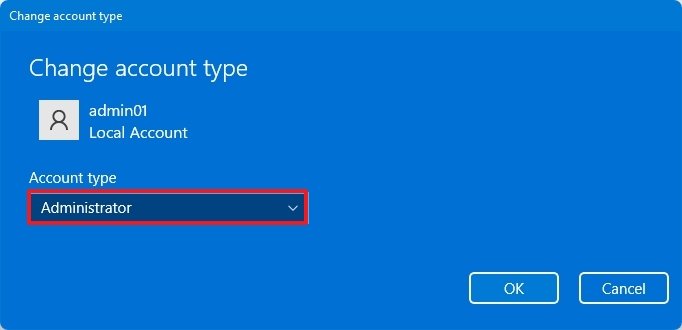 Source: Windows Key
 - Click the OK push.
- Sign out of the account.
- Sign in with the new local account.


If you tin can now run into the new account, you lot may want to consider transferring your files to the new account. Later moving your files and configuring your settings from the Family & other users setting page, remove the account that's not working, and then link the new account with your Microsoft account from Settings > Accounts > Your info, and clicking the Sign in with a Microsoft account instead option.
After you complete the steps, you should at present run across the Windows 11 Commencement menu and Taskbar.
How to 'This PC can't run Windows 11' error on Windows xi
On devices equipped with uniform hardware may still run into "This PC tin can't run Windows xi" or "this PC can run Windows 11" mistake message that volition foreclose you from upgrading via the Windows Update settings page.
If you happen to receive this fake-positive error, you can still use the PC Health Check app to ostend the device is compatible, and then, yous tin use the Installation Banana to upgrade.
Cheque compatibility
To ostend your calculator is compatible, use these steps:
-
Open PC Health Check download page.
Quick note: The download selection is at the bottom of the folio.
-
Under the "Check for compatibility" section, click the Download PC Wellness Check App button.
 Source: Windows Central
 - Double-click the WindowsPCHealthCheckSetup.msi file.
- Click the I accept the terms in the License Understanding option.
-
Click the Install button.
 Source: Windows Central
 -
Check the Open Windows PC Health Cheque option (if applicable).
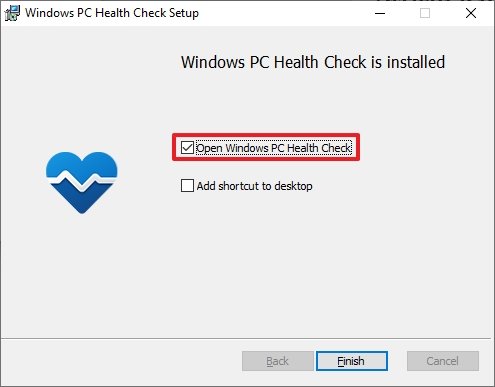 Source: Windows Fundamental
 - Click the End push.
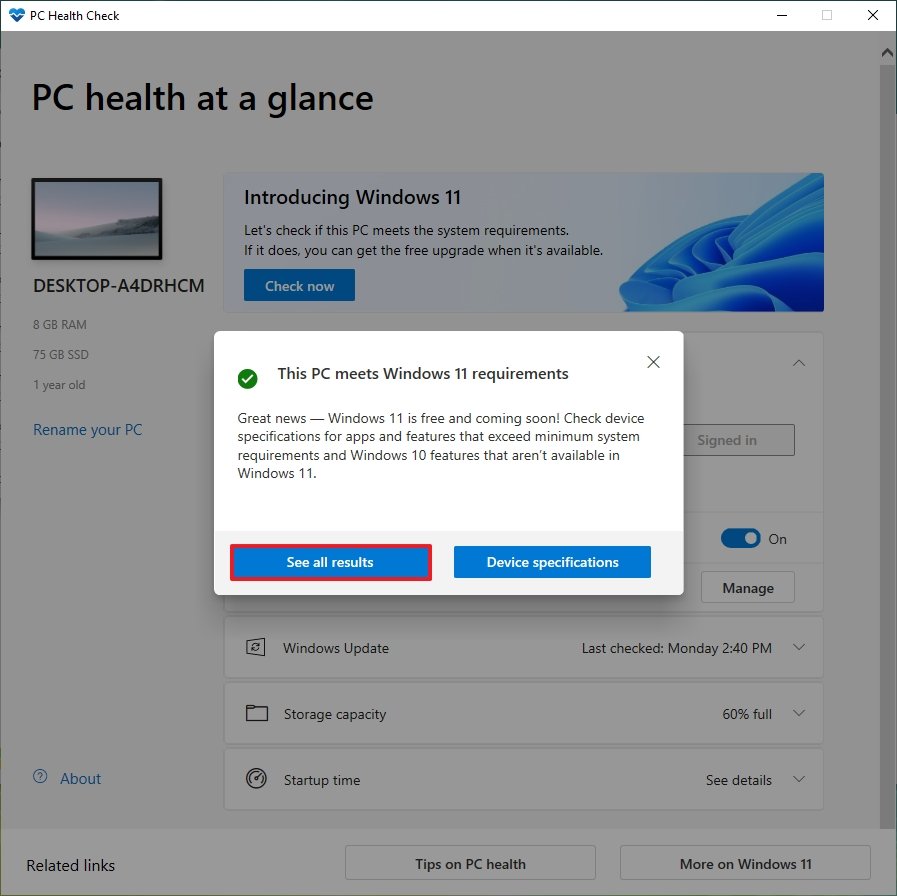
- Under the "Introducing Windows 11" section, click the Check now button.
-
Click the Meet all results push to brandish the final study.
 Source: Windows Fundamental


Later on you consummate the steps, yous volition know if the computer will back up Windows eleven.
Upgrade using Installation Assistant
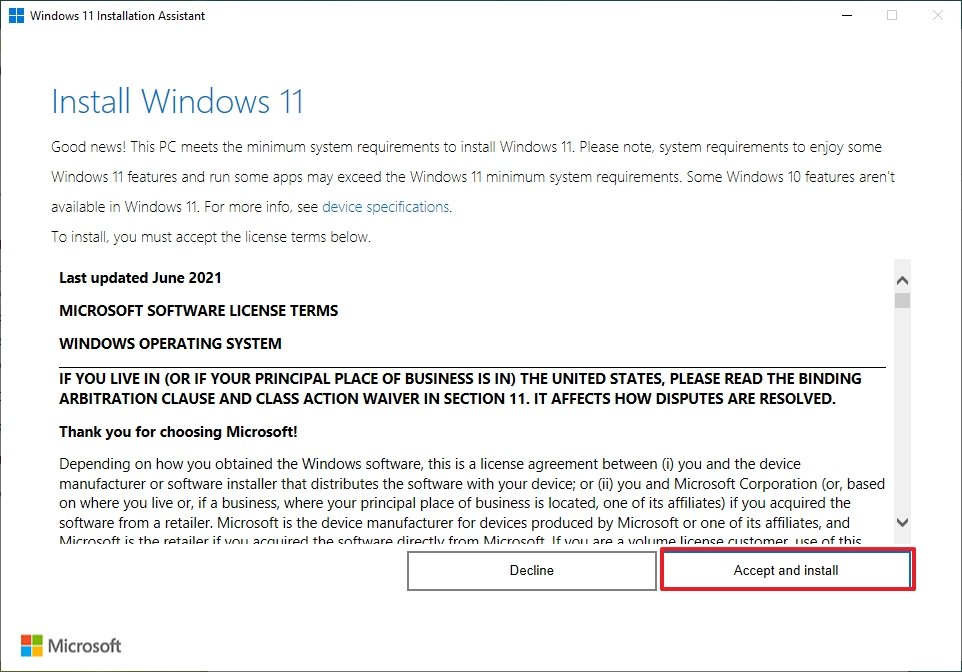
To use the Installation Assistant tool to upgrade to Windows xi, utilise these steps:
- Open up this Microsoft support website.
- Under the "Windows 11 Installation Assistant" section, click the Download Now push.
- Salvage the file on the computer.
- Double-click the Windows11InstallationAssistant.exe file to launch the setup.
-
Click the Accept and install button.
 Source: Windows Fundamental

After yous complete these steps, the tool will proceed with the installation of Windows xi.
How to USB printer problems on Windows 11
The printer maker Brother has confirmed that in that location's a compatibility effect, which prevents Windows 11 from detecting certain printers continued using a USB cable.
On the official back up page, Brother says that upgrading to Windows 11 may foreclose your reckoner from detecting the printer using a USB connection, irresolute the printer's settings, or connecting another printer using USB.
While there isn't a workaround for this trouble, the company recommends connecting the printer using some other connection, such as Wi-Fi or Ethernet.
Connect Brother printer via wireless
Before proceeding, brand certain to enable and configure the wireless impress service in the printer itself. Since this is different, depending on the device, check your manufacturer support website for more specific details.
To connect a printer via Wi-Fi, utilise these steps:
- Open up Settings.
- Click on Bluetooth & devices.
-
Click the Printers & scanners page from the correct side.
 Source: Windows Primal
 -
Click the Add device button.
 Source: Windows Central
 - Select the Blood brother printer to complete the setup.


One time y'all complete the steps, the printer should start working correctly on Windows 11.
How to non-ASCII characters app problem on Windows eleven
As of the initial rollout phase, Microsoft has found a compatibility outcome with some applications that use non-ASCII characters in their registry keys or subkeys. According to the health dashboard website for Windows 11, afflicted programs may not work as expected, and the Registry keys may not be repairable.
Microsoft is currently placing an upgrade hold to prevent the issue from more computers, and it'southward advising users not to upgrade using the Installation Assistant or Media Creation Tool until there is a fix for the issue.
If you have to come across this issue, it's best to revert the setup to the previous version and reinstall the afflicted applications (if applicable).
To roll dorsum to the previous version of Windows, use these steps:
- Open Settings.
- Click on Organisation.
-
Click the Recovery page on the correct side.
Source: Windows Central -
Nether the "Recovery options" section, in the "Previous version of Windows" settings, click the Become back button.
Source: Windows Central Quick note: If the selection is not available, you may need to use the reinstallation procedure as outlined below.
-
Select whatever of the reasons available.
Source: Windows Central - Click the Next button.
-
Click the No, thanks push button.
Source: Windows Central -
Click the Side by side button.
Source: Windows Cardinal -
Click the Adjacent button again.
Source: Windows Central -
Click the Get back to earlier build button.
Source: Windows Cardinal
After you lot complete the steps, y'all should wait until there's a resolution for this problem before upgrading once again.
How to printer setup problem on Windows eleven
If your Windows xi calculator connects to a network printer, during the initial setup, the system may fail to download and install the device drivers because of a compatibility issue between the printer server using an HTTP connexion with the new version of Windows 11.
If yous encounter this issue, it's recommended to download and install the printer driver manually from the manufacturer'southward support website.
The manufacturer will have specific instructions to install the driver and connect the computer to the network printer. Typically, you only need to launch the setup wizard and continue with on-screen directions.
In addition, Microsoft has also best-selling ii other networking printer issues, but these scenarios are not unremarkably seen in home computers. Instead, these printing issues could affect press solutions in organizations.
The start one includes a problem with the printer server where the customer may not receive the custom configuration. This won't affect the printing feel, but custom settings may not apply to the client. So the second i is an issue that may forbid the figurer from installing the printer successfully using Cyberspace Printing Protocol (IPP).
Microsoft has acknowledged these issues, and information technology's working on the fixes that information technology plans to release in futurity updates.
Windows 11 tips to minimize installation problems
Although the upgrade process to Windows 11 should go smoothly since the company will try to offer the new version only to those devices known to take a adept upgrade experience, you may withal come across a problem during and afterwards the installation. However, if you plan ahead, you volition minimize the chances of problems. And if you exercise come across problems, you will be able to recover rapidly without losing your files.
Create temporary fill-in
A full backup is perhaps the best recovery strategy if something goes wrong with the installation and yous demand to roll back. It's as well an excellent fashion to protect your files.
If you employ specific backup software, use it to create a security copy before the upgrade. If you lot don't, you tin ever make a temporary backup using the imaging tool bachelor on Windows 10. In addition, it is also recommended to create a file backup to an external bulldoze or deject using OneDrive.
Disable metered connection
A metered connexion will prevent Windows Update from downloading the Windows 11 files. If you plan to upgrade through Windows Update, make sure the connection is non configured as metered.
If you have a capped net connection, connect to another network or disable the metered connection (assuming that y'all have plenty data left) to upgrade to Windows 11.
To disable a metered connection on Windows 10, utilize these steps:
- Open Settings.
- Click on Network & Security.
- Click on Wi-Fi or Ethernet.
-
Select the active network connectedness.
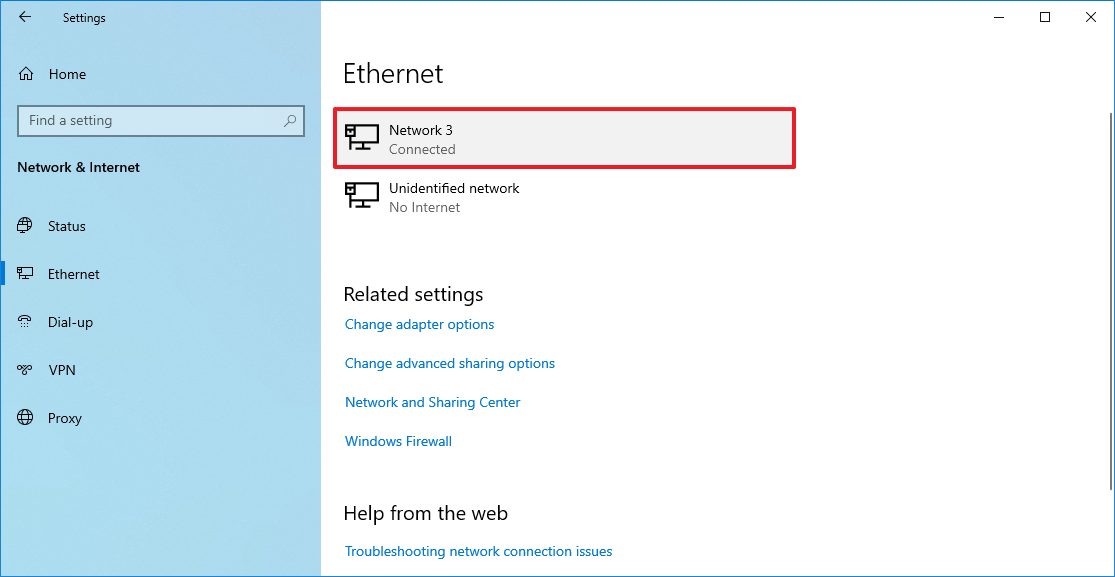 Source: Windows Fundamental
 -
Under the "Metered connexion" section, turn off the Set as metered connexion toggle switch.
 Source: Windows Central


After you complete the steps, Windows Update should be able to download the Windows 11 files on the computer.
Uninstall non-essential apps
Applications that were not designed for Windows x or Windows 11 tin cause compatibility issues. You lot tin always avert these issues past removing those apps that may cause issues before the installation. These apps usually are old programs and third-political party security solutions.
To uninstall apps on Windows x, use these steps:
- Open Settings.
- Click on Apps.
- Click on Apps & features.
-
Select the app you desire to remove, and click the Uninstall push.
Source: Windows Central - Click the Uninstall button again.
- Continue with the on-screen direction (if applicable).
After you consummate the steps, repeat the instructions to uninstall the remaining apps as necessary.
Likewise, if y'all use a 3rd-party antivirus or firewall, check the software support website for specific details on how to disable or uninstall the application. After the installation, you tin reinstall the apps once more.
Disconnect non-essential peripherals
Non-essential peripherals (USB wink drives, SD cards, external hard drives, printers, scanners, dongles, and Bluetooth devices) tin cause the installation to fail. If you have any peripherals connected to the reckoner, disconnect them. Y'all simply need a monitor, keyboard, mouse, and internet connection.
Afterward the installation, y'all tin can reconnect the peripherals to the computer.
Start fresh with a make clean installation
If you have tried many troubleshooting steps, you should stay on Windows 10 and wait a piddling longer. If you cannot wait, consider doing a clean installation of Windows 11.
The reason is that the laptop or desktop computer will start with a fresh copy of Windows xi, which can also assist resolve other problems with the previous installation. On the other paw, an upgrade modifies the previous setup, which can cause problems.
A make clean installation is almost a straightforward process. It only takes more time since you need to create a USB flash drive and reconfigure the arrangement afterwards the installation. You can apply this guide with all the steps to perform a fresh install of Windows 11.
More Windows resource
For more helpful manufactures, coverage, and answers to mutual questions about Windows 10 and Windows eleven, visit the following resources:
- Windows 10 on Windows Central — All you need to know
- Windows 10 assistance, tips, and tricks
- Windows eleven on Windows Primal — All you need to know
We may earn a committee for purchases using our links. Learn more.

Indefinite greatness
Is Minecraft worth playing in 2022?
Minecraft has dominated the video game manufacture for well over a decade, only is information technology notwithstanding worth playing in 2022? Against all odds, Minecraft has managed to remain relevant with its persistent updates and unique customs support.

Information technology eats monsters for breakfast
Xbox Series 10 ultimate guide: Everything you lot need to know
Here's everything you need to know almost the new-generation Xbox panel from Microsoft: Xbox Series X. This 12TF fauna is the near powerful video game panel always made, and comes with a range of fresh features and nuances to accept your panel gaming to the next level.
Source: https://www.windowscentral.com/windows-11-common-problems-and-fixes
Post a Comment for "We Were Unable to Reach Your Phone Please Try Again Errorcode 50012"